Membership questions? Log in issues? Email info@brewersassociation.org

Author Topic: K-RIMS / Breweasy  (Read 8648 times)

Offline Stevie

  • Official Poobah of No Life. (I Got Ban Hammered by Drew)
  • *********
  • Posts: 6858
K-RIMS / Breweasy
« on: September 17, 2015, 03:21:57 pm »
In my quest to convert to electric, I have determined the cost for a PID controlled element is barely higher than a rheostat controlled element. If I am going to bother with a PID, I might was well go for a Kettle-RIMS type setup with my existing coolers. It would be nice to only need to measure my water once and basically be able to forget about everything until ready to boil.

What I am wondering is if I should bother putting together manifolds for the two coolers. I plan on resting the cooler on top of the kettle and having the runoff gravity feed into the kettle with the pump pulling from the kettle to some form of sparge setup. Currently using a bazooka in my 70qt and a hose braid in my 48qt tuns.

Another added benefit of the PID is the manual control power is in a digital 1-100 scale. Once I determine the power rating to hold a boil at a given volume, I can repeat it more easily compared to a non-linear dial.
« Last Edit: September 17, 2015, 05:02:58 pm by Steve in TX »

Offline AmandaK

  • Senior Brewmaster
  • ******
  • Posts: 1850
  • Redbird Brewhouse
Re: K-RIMS / Breweasy
« Reply #1 on: September 18, 2015, 06:35:50 am »
Steve, I am in the process of researching a tiny electric brewery for winter time and pilot batches.

I'm currently leaning towards what you're talking about, which is basically making a "cheap BrewEasy".

For the PID/rheostat, I think the High Gravity EBC-SV ($395) will work perfectly with this. I also think a kettle with a boil coil (or similar element) will do well for heating/maintaining temps.

As to your question on the manifold... this is probably the part I have the most questions about. I know that recirculating can be a tricky beast (as evidenced by our Sabco), so having a proper manifold/false bottom/bazooka screen is a huge factor in how well this system will work. Obviously, the Blichmann false bottom is some of the tops in quality and efficiency - but can you find a cooler it that will work with? Bazooka screen, that will create channeling. Most other 'manifold' type setups will also create channeling but to a lesser degree. I think I'm looking at finding a round cooler and getting a perforated false bottom with a center pick up to eliminate as much channeling as I can an promote even mixing as much as possible.

Anyway, it sounds like we might be attempting very similar projects! Looking forward to seeing what we come up with.
Amanda Burkemper
KC Bier Meisters Lifetime Member - KCBM 3x AHA Club of the Year!!
BJCP Assistant (to the) Midwest Rep
BJCP Grand Master/Mead/Cider


Our Homebrewed Wedding, AHA Article

Offline AmandaK

  • Senior Brewmaster
  • ******
  • Posts: 1850
  • Redbird Brewhouse
Re: K-RIMS / Breweasy
« Reply #2 on: September 18, 2015, 06:38:38 am »
I should note, I am looking to stay at 120V and use the 2250w Boil Coil for this. I'm not interested in running more 240V at this time.

Based on the calcs on the Blichmann website, the 2250w element should be able to go from 70f to 160f in about 30' and 168f to boil in about 15'. That's faster than a 10g batch on the Sabco so it is more than acceptable here.
Amanda Burkemper
KC Bier Meisters Lifetime Member - KCBM 3x AHA Club of the Year!!
BJCP Assistant (to the) Midwest Rep
BJCP Grand Master/Mead/Cider


Our Homebrewed Wedding, AHA Article

Offline mabrungard

  • I spend way too much time on the AHA forum
  • ********
  • Posts: 2903
  • Water matters!
    • Bru'n Water
Re: K-RIMS / Breweasy
« Reply #3 on: September 18, 2015, 06:53:17 am »
If you are trying to control the heating of a RIMS circuit, you have to have a regular PID with the temp sensor mounted immediately downstream of the heating element.

If you are looking for boil control, a PID is a waste of money. You have to have some sort of proportional control to throttle the power to the element. A pulse-width modulator works well, but the unit shown below works really well and has a nice LED showing what your power percentage is. It's inexpensive too.

http://www.auberins.com/index.php?main_page=product_info&cPath=2_30&products_id=444
Martin B
Carmel, IN

BJCP National
Foam Blowers of Indiana (FBI)

Brewing Water Information at:
https://www.brunwater.com/

Like Bru'n Water on Facebook
https://www.facebook.com/Brun-Water-464551136933908/?ref=bookmarks

Offline Stevie

  • Official Poobah of No Life. (I Got Ban Hammered by Drew)
  • *********
  • Posts: 6858
Re: K-RIMS / Breweasy
« Reply #4 on: September 18, 2015, 07:11:59 am »
Amanda - my coolers are rectangular, so I guess I could order something custom, or use some perf stock and stainless bolts as stand offs. The EBC-SV is nice, but for that price I can put something together that has more bells and whistles like lights, a main power switch, maybe even a fail safe.

Martin - that's what I don't know. At first I was only interested in boil control, but PIDs are only a few bucks more compared to the unit you linked. I might even consider going with that unit and a PID along with a 3-position switch to determine which is being used.

Way too many options here.

Offline AmandaK

  • Senior Brewmaster
  • ******
  • Posts: 1850
  • Redbird Brewhouse
Re: K-RIMS / Breweasy
« Reply #5 on: September 18, 2015, 07:51:53 am »
Martin, I'm looking for precise mash temp control - so we would 'need' the PID - as well as a somewhat manual boil control - the rheostat. I am also electrically challenged. I just figured out how to wire a temp controller last year. So the High Gravity EBC-SV, while pricier than doing it myself and may not have the bells and whistles of others, will save me a lot of time and trouble. Plus, I'm going for an electric system that brews faster than the Sabco (we are running at ~7 hours from lighting the first burner to clean up), is marginally cost-effective, has a small footprint, and works well.

If I do end up with the High Gravity controller, I really only have to worry about moving wort around during the mash effectively (I think). I'm thinking of making/buying something similar to this for the false bottom. BTW - when I first got into brewing, these things were not as expensive! And that was only ~5 years ago!  :o
Amanda Burkemper
KC Bier Meisters Lifetime Member - KCBM 3x AHA Club of the Year!!
BJCP Assistant (to the) Midwest Rep
BJCP Grand Master/Mead/Cider


Our Homebrewed Wedding, AHA Article

Offline Stevie

  • Official Poobah of No Life. (I Got Ban Hammered by Drew)
  • *********
  • Posts: 6858
Re: K-RIMS / Breweasy
« Reply #6 on: September 18, 2015, 08:58:59 am »
That's a bit nuts at $75

Offline denny

  • Administrator
  • Retired with too much time on my hands
  • *****
  • Posts: 27133
  • Noti OR [1991.4, 287.6deg] AR
    • Dennybrew
Re: K-RIMS / Breweasy
« Reply #7 on: September 18, 2015, 09:35:01 am »
Steve, I am in the process of researching a tiny electric brewery for winter time and pilot batches.


One word....Zymatic.
Life begins at 60.....1.060, that is!

www.dennybrew.com

The best, sharpest, funniest, weirdest and most knowledgable minds in home brewing contribute on the AHA forum. - Alewyfe

"The whole problem with the world is that fools and fanatics are always so certain of themselves, and wiser people so full of doubts." - Bertrand Russell

Offline stpug

  • Brewmaster
  • *****
  • Posts: 742
Re: K-RIMS / Breweasy
« Reply #8 on: September 18, 2015, 09:41:16 am »
In my quest to convert to electric, I have determined the cost for a PID controlled element is barely higher than a rheostat controlled element. If I am going to bother with a PID, I might was well go for a Kettle-RIMS type setup with my existing coolers. It would be nice to only need to measure my water once and basically be able to forget about everything until ready to boil.

What I am wondering is if I should bother putting together manifolds for the two coolers. I plan on resting the cooler on top of the kettle and having the runoff gravity feed into the kettle with the pump pulling from the kettle to some form of sparge setup. Currently using a bazooka in my 70qt and a hose braid in my 48qt tuns.

Another added benefit of the PID is the manual control power is in a digital 1-100 scale. Once I determine the power rating to hold a boil at a given volume, I can repeat it more easily compared to a non-linear dial.

I'm intrigued by the direction you're headed here. However, I think I'm a little confused as well.

You mention coolerS and a kettle, however the breweasy design would be the equivalent of one cooler and a BK. Are you somehow planning on using a second cooler in your design, or is it that you just happen to have two coolers to pick from for your design?

As far as the K-RIMS design goes, my assumption is that the recirculation during the mash is:
-wort drains by gravity from MLT into BK
-wort is heated in BK by flame or element to temp set on PID
-wort is pumped back up to MLT and "sprinkled" on top of grainbed
Is that about correct? Am I missing important aspects of the design?

I'm slow with all of this automated/electric stuff so bare with me while I try to catch up. A homemade breweasy design really intrigues me due to footprint, automation, and cleanup, but the cost of the Blichmann setup is YOWZERS!

And, sorry Denny, but I can't bring myself to pay for and use the Zymatic. It seems like a toaster for making beer :D

Offline AmandaK

  • Senior Brewmaster
  • ******
  • Posts: 1850
  • Redbird Brewhouse
Re: K-RIMS / Breweasy
« Reply #9 on: September 18, 2015, 09:44:21 am »
Steve, I am in the process of researching a tiny electric brewery for winter time and pilot batches.


One word....Zymatic.
Trust me, I've looked at it. There are many, many pros. However...

Concerns:
- It is not able to be used outside of WiFi and the proprietary website. IF Pico goes out of business, I have a $2000 brick on my counter. This is the opposite of appealing. Or if they don't update the web based software in the future, there are potential issues there too. This is my #1 concern. Having a system that cannot be used with only my input is just asking for it to be outdated within 5 years. (Same reason I don't have a smart watch - real watches are obviously a more long term purchase.)
- It's $2k plus shipping.
- It only makes 2.5g of beer at a time (but this is also a plus in some cases).
Amanda Burkemper
KC Bier Meisters Lifetime Member - KCBM 3x AHA Club of the Year!!
BJCP Assistant (to the) Midwest Rep
BJCP Grand Master/Mead/Cider


Our Homebrewed Wedding, AHA Article

Offline AmandaK

  • Senior Brewmaster
  • ******
  • Posts: 1850
  • Redbird Brewhouse
Re: K-RIMS / Breweasy
« Reply #10 on: September 18, 2015, 09:58:09 am »
Way too many options here.

Agreed. I've gone from wanting to convert the Sabco to electric (which would cost about as much or more than a BrewEasy), to wanting a PicoBrew, to eBIAB, to a modified eBIAB, to this K-RIMS idea.

For those who haven't studied the BrewEasy manual, here is the TL; DR version of K-RIMS:


That's a bit nuts at $75

Yeah, right??
« Last Edit: September 18, 2015, 10:24:52 am by AmandaK »
Amanda Burkemper
KC Bier Meisters Lifetime Member - KCBM 3x AHA Club of the Year!!
BJCP Assistant (to the) Midwest Rep
BJCP Grand Master/Mead/Cider


Our Homebrewed Wedding, AHA Article

Offline Stevie

  • Official Poobah of No Life. (I Got Ban Hammered by Drew)
  • *********
  • Posts: 6858
Re: K-RIMS / Breweasy
« Reply #11 on: September 18, 2015, 10:03:47 am »

In my quest to convert to electric, I have determined the cost for a PID controlled element is barely higher than a rheostat controlled element. If I am going to bother with a PID, I might was well go for a Kettle-RIMS type setup with my existing coolers. It would be nice to only need to measure my water once and basically be able to forget about everything until ready to boil.

What I am wondering is if I should bother putting together manifolds for the two coolers. I plan on resting the cooler on top of the kettle and having the runoff gravity feed into the kettle with the pump pulling from the kettle to some form of sparge setup. Currently using a bazooka in my 70qt and a hose braid in my 48qt tuns.

Another added benefit of the PID is the manual control power is in a digital 1-100 scale. Once I determine the power rating to hold a boil at a given volume, I can repeat it more easily compared to a non-linear dial.

I'm intrigued by the direction you're headed here. However, I think I'm a little confused as well.

You mention coolerS and a kettle, however the breweasy design would be the equivalent of one cooler and a BK. Are you somehow planning on using a second cooler in your design, or is it that you just happen to have two coolers to pick from for your design?

As far as the K-RIMS design goes, my assumption is that the recirculation during the mash is:
-wort drains by gravity from MLT into BK
-wort is heated in BK by flame or element to temp set on PID
-wort is pumped back up to MLT and "sprinkled" on top of grainbed
Is that about correct? Am I missing important aspects of the design?

I'm slow with all of this automated/electric stuff so bare with me while I try to catch up. A homemade breweasy design really intrigues me due to footprint, automation, and cleanup, but the cost of the Blichmann setup is YOWZERS!

And, sorry Denny, but I can't bring myself to pay for and use the Zymatic. It seems like a toaster for making beer :D
Two coolers to be used independent depending on batch size. Might throw a third (20qt) in the mix for lower gravity batches.

You got the basic functions down.

Nothing against the zymatic, just not for me.

S. cerevisiae

  • Guest
Re: K-RIMS / Breweasy
« Reply #12 on: September 18, 2015, 11:33:15 am »
Martin, I'm looking for precise mash temp control - so we would 'need' the PID - as well as a somewhat manual boil control - the rheostat.

I personally think that the High Gravity design is a bit of a hack.  If you want PID control and easy manual control, what you really want is a PID and the unit that Martin has linked.  All you need to do is to use a double-pole double-throw switch between the +/- control output connections on both units and the +/- control inputs of the SSR.   

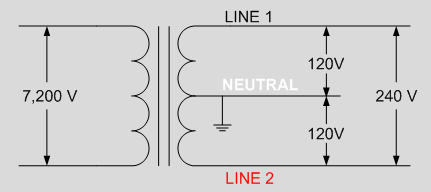
You are more than smart enough to wire to up a simple control unit, especially a 120V system because only the black (hot) wire needs to be switched.   By code, the white (neutral) is bonded to ground at the distribution panel (a.k.a. fuse or breaker box).  U.S. power is 240 split-phase.  A transformer outside of your home steps the distribution voltage from 7.2K Volts AC down to 240 Volts AC.  If your subdivision is fed with underground wires, the transformer will be on the ground in someone's yard or in a common area.  In older areas that are fed by overhead lines, the step-down transformer is on a pole.

The step-down transformer has three secondary winding taps that feed your home; namely, two hot legs that are the ends of the secondary winding and a wire that is located mid-way on the secondary winding known as the center-tap.   The center-tap is what becomes the white wire after power service enters your home.  It is the zero crossing for the AC power signal, which is a sine wave (thanks to Nikola Tesla).  The voltage delta between the coil ends (hot legs) is 240 volts.  The voltage delta between center-tap and either of the hot legs is 120V.  If we run a circuit that consists of only the center-tap and one of the hot legs, we obtain a 120V circuit that is 1/2th of the sine wave, which is why the power distribution system is known as split-phase.


Here's where anyone who is considering using a 120V BoilCoil needs to be careful.  The most common "branch" circuit in a home is 120V 15A.   One cannot plug a 2250W BoilCoil into a 15A circuit.   The electrician who wired your home should have labeled the branch circuits inside of the distribution panel (breaker box).  Identify the circuit that you plan to use, and then check the number on the breaker.  Unless it says 20, the circuit cannot be used for a 120V BoilCoil-equipped kettle.  Furthermore, one has to be careful that a previous owner has not replaced a 15A breaker with a 20A breaker without upgrading the wire.  A 20A circuit requires 12AWG wire.  Fifteen amp circuits are wired with 14AWG, which can overheat when one attempts to draw more than 15A.  AWG sizing works the opposite way that people think.  The higher the number, the smaller the diameter.  The smaller the diameter, the higher the resistance.

With that said, there are usually two branch circuits that are almost guaranteed to be 20A circuits.  The first circuit is the one for one's washing machine.  It will usually be a single receptacle where one of the slots looks like a "T" turned on it's side.  If the circuit is wired to code, that type of receptacle indicates the circuit is capable of carrying 20A.  The other circuit is often labeled "Kitchen Circuit."  This circuit is usually wired to the receptacles that line one's kitchen counter top.  It will also usually have GCFI breakers.  If your kitchen circuit is 20A, and you want to use it to power a BoilCoil, you should upgrade the GFCI receptacles on this circuit to 20A GFCI receptacles.

http://www.homedepot.com/p/Leviton-SmartLockPro-20-Amp-Slim-GFCI-Duplex-Outlet-White-R02-N7899-0KW/203427638


By the way, the 2250W BoilCoil does not draw 2250W of power on a good day.  My 2250W BoilCoil has a resistance of 7.1 Ohms.  Power equals voltage multiplied by current.  In this case, we only know the line voltage and the coil
resistance; however, we can use Ohm's law to determine the current.

P (watts) = E (voltage) * I (current)

I (current) =  E (voltage) / R (resistance)

Therefore

P (watts) = E (voltage) *  E (voltage) / R (resistance)

E = 120
R = 7.1

P = 120 * 120 / 7.1 = 2,028W

The 2250W BoilCoil actually draws 2,028 / 120 = 16.9 amps of current.
« Last Edit: September 22, 2015, 03:17:02 pm by S. cerevisiae »

Offline AmandaK

  • Senior Brewmaster
  • ******
  • Posts: 1850
  • Redbird Brewhouse
Re: K-RIMS / Breweasy
« Reply #13 on: September 18, 2015, 02:59:27 pm »
You guys got me thinking (as usual) - looking at PIDs and such really isn't that big of a stretch. I almost understand this, but I'll get there - maybe with pictures:

If you want PID control and easy manual control, what you really want is a PID and the unit that Martin has linked.  All you need to do is to use a double-pole double-throw switch between the +/- control output connections on both units and the +/- control inputs of the SSR.

Back to our OP: so Steve, do you have a wiring diagram in mind for your K-RIMS?
Amanda Burkemper
KC Bier Meisters Lifetime Member - KCBM 3x AHA Club of the Year!!
BJCP Assistant (to the) Midwest Rep
BJCP Grand Master/Mead/Cider


Our Homebrewed Wedding, AHA Article

Offline Stevie

  • Official Poobah of No Life. (I Got Ban Hammered by Drew)
  • *********
  • Posts: 6858
Re: K-RIMS / Breweasy
« Reply #14 on: September 18, 2015, 03:37:51 pm »
I have the basics, but not all of the internal components figured out. I have a buddy that's good with this, so I can basically show him what I want and how I want it to work. He will then figure out how to make it work.

I was working on my panel art earlier. I'll upload it when I get a chance.

The components do get pricey, but I still think I can put something together that offers more compared to the high gravity offering at $500.