Rob, of Salt Lake City’s ZZHOPS homebrew club, has embarked on a journey to put together a brewing system and process that can achieve consistent and repeatable results. After all, one of the hardest skills to master when homebrewing is not brewing a fantastic beer, but being able to recreate your favorite homebrew recipe to a tee! Read how a homemade grain mill has brought Rob one step closer to controlling all the variables in homebrew setup.
Like a lot of other homebrewers, my system seems to be constantly evolving as I try to find ways to improve processes that yield better results in my finished beer. My ultimate goal is to make great beer while ensuring I have repeatable results. I remember reading a post in a brewing forum about the same time I switched from extract to all-grain. The post was claiming homebrewers can never make the same beer twice because there are too many variables involved. I remember thinking on one level he had a point, but at the same time I figured commercial brewers can do it so why can’t I? That post inspired me to try to remove as many variables as possible from my brew system so that I get as repeatable results as possible.
 My first step to removing variables from my processes was switching to an all-grain system. You could argue that switching to all-grain actually added variables, but it also gave me more control over my brews. Next up was upgrading my system to a BCS-460 controlled eHERMS to gain tighter control of mash temperatures. After that, I added a digitally controlled fermentation chamber to better control fermentation temperatures.
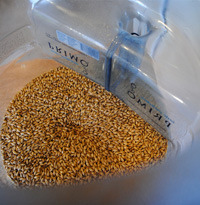
My next target was brewhouse efficiency. I tend to order grain from a variety of sources including local and online brew shops. I always used the shops’ mills, and I could see the crush was different from shop to shop. I figured milling my own grain would allow me to remove one more variable from the brewing equation because it should result in a consistent crush from one brew day to the next. Plus, I liked the idea of buying my base malts in bulk thus lowering my cost per batch and allowing me to brew more often. This led to my most recent equipment addition: my custom built grain mill.
After dropping a few dozen hints, my wife surprised me with a bare bones grain mill for my birthday: the 2D from Crankandstein. I immediately started working on my design. My requirements were that it needed to have a small footprint so it didn’t take up much space in my already crowded garage, it needed to be on casters so it was mobile, and it needed to make use of a furnace motor I’d bought a couple years ago. I also wanted it to look good with a simple streamlined approach and not like it had been thrown together with a bunch of spare parts from a junkyard.
I had some leftover 1.5” 16 gauge steel tubing from some other projects, which was same size tubing I used to make my brew stand so I figured it would be plenty strong for a grain mill. I took some measurements and proceeded to make a simple box frame out of the steel tubing. It consists of four vertical posts welded to upper and lower horizontal supports. After all the welding was done, I spray painted the frame so it looked nice and had some rust protection.
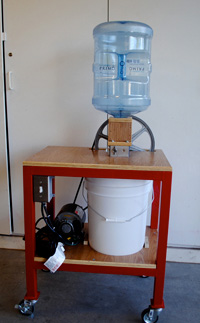 For the shelves I used 3/4” oak plywood attached to the horizontal supports of the box frame. The mill is mounted to the upper shelf and the motor is mounted to the bottom shelf. Mounting the motor to the bottom shelf helped lower the center of gravity and keeps the mill stable when rolling it around my garage. The lower shelf also holds the five gallon bucket that catches the crushed grains. I used a round over bit and my router to ease the sharp edges of the plywood, and then everything was sanded smooth and sealed with a few coats of high gloss polyurethane.
The hopper is simply an inverted plastic water cooler bottle with the bottom cut out. It may not be the prettiest hopper around, but it’s cheap, works great, holds quite a bit of grin, and was easy to mount. To mount the hopper on the mill, I made a box out of the same 3/4” plywood as the shelves. This box is bolted to the top of the mill and the neck of the carboy slides into a 2 1/4” hole in the top. It has a couple of 45 degree inserts that direct the grain into the gap between the rollers.
To power the mill, I’m using a 1/4 HP 1725 RPM 110V furnace motor. I picked this up from a local classifieds site for about $20. Brand new motors can run about $60 and up, so it never hurts to check the local classifieds and garage sales for cheap used motors. The 1.5” sheave on the motor and a 12” sheave on the mill result in a mill speed of around 200RPM which is just about perfect. The 1/4 HP motor is about the smallest motor I’d recommend for this kind of setup. Anything smaller would likely be underpowered and might have a tendency to stall out. The motor is controlled by a standard 110V 15amp light switch mounted on the front of the mill.
I’ve used the mill on about half a dozen batches now and so far it’s been working great. Unfortunately I haven’t had a chance to brew the same recipe twice yet, so I’m still working on verifying repeatability. However, I have been tracking my brewhouse efficiency and it has settled in right around 83 percent. When I used the shop mills my efficiency tended to vary between slightly under 70 percent to almost 80 percent, so being able to mill my own grain at home is definitely giving me more consistent results. Long story short, based on my experience a grain mill can be an important piece of the pie when it comes to getting repeatable results. Building it was a fun project and the best part is knowing my crush is much more consistent and that is one less variable I need to worry about.

Share Post