THE BEER CART
Congratulations to Oscar for outfitting this awesome portable barrel. It’s a really unique and fun way to “transport” your homebrew, and I’m sure you won’t find anything like it anywhere else! Here’s how he describes building his very own beer cart:
The purpose of making this beer cart was “mobile distribution”.
Oak barrels are used for aging a variety of beers, wines and distilled products. This particular barrel was used to age bourbon, and it was charred on the inside to impart flavor. By law they can only be used once for bourbon, and then they are sold. This one was purchased by Wyerbacher Breweries of Easton, PA. They used it to age a beer and pull some of the bourbon flavor from it, as it is soaked into the wood.
The barrel was cheap ($25), the wheels were not, and they ran about $400. The wheels are made of wood and have two bearings each, a steel band with a solid rubber tire and a 1” axle. Two to three Cornelius kegs, ice and a CO2 bottle weigh close to 150 pounds. Add that to the barrel and that’s close to 200 pounds! I wanted and needed this thing to roll lightly.
The handles are from Home Depot, sold as spares for wheel barrows. They’re about $13 each. The height of the handles is adjustable, so as the load changes (3 full kegs and an ice bucket, to almost 2 empties would be the range) you can adjust it so it’s always at a comfortable ride height for any person. They also fold down for transportation. The taps are stainless bronze-plated Perlick taps. NEVER skimp on taps. The taps are on the “driver’s side” for a few different reasons:
1. It allows me to be the bartender and keep everything under control. I also don’t have to get out from behind the barrel to pour a beer.
2. To maintain as much of a historical period look as possible for medieval applications.
3. The handles fold down to the back and this way all the sharp objects are on one side during transportation, and the taps are protected by the handles.
As far as difficulty and time are concerned it was not a hugely demanding project. All the steel is standard flat stock, and this as well as the hardware is all available at your local home improvement center. I used carriage bolts to keep the look as non-modern as possible.
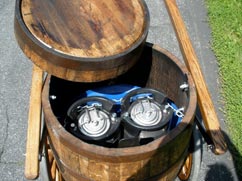
I started with cutting the barrel with a sawzall just above the second hoop from the top, and unless you know it, it’s hard to see that the barrel was cut. Four steel tabs screwed on from the inside, keep the “lid”. I then proceeded with scraping off the charred inside, and vacuuming that out. Two steel plates bolted to the 2nd and 3rd hoop from the bottom distribute the load from the axle, and provide flexibility with axle height. (See pictures) The handles are also bolted through a hoop, as are the plates that locate them at the end of the handles. Thus the handle load is distributed to a total of four points. There are bolts through every hoop to help distribute the loads, and to keep the hoops in place (see the part about drying out below). Some gas pipe and fixtures made up a stand on the bottom in the front to keep the barrel horizontal when parked. When “driving”, it is elevated enough in the air to provide enough road clearance.
The wheels were “aged” with a torch, then stained, and then treated with boiled linseed oil for a rustic look. The barrel was also wiped down with boiled linseed oil. The installation of the taps is straight forward.
And that’s about it, except for the drying out. On most barrels, the hoops hold the staves in place and there is no further hardware. The cooper whacks things tight, the barrels are filled with liquid, the wood swells and all is tight and liquid proof. However, if you take an empty barrel and put it out in the sun, it will dry, the staves will shrink, and you end up with a pile of “sticks and hoops”. This is bad. So, you have to keep the barrel wet. I have about ten inches of water in there, and regularly take a large car washing brush and wet the insides. I keep the lid on to maintain a high humidity environment. But, this is also the perfect world for bugs. So, white and green fuzz WILL grow unless you stop it. I tried iodophor (sanitizer) and StarSan…..no luck. Right now I add a little bleach, that seems to work, although I am not sure what the long term effects of that are going to be. It needs regular TLC.
But, it’s worth it. The cart has been to several private and public events and is a hit, hands down. The only thing I’m going to change is that I am adding a third tap, in between the two existing. If you want to build something like this and have questions, feel free to shoot me a message at: oscar@noln.com Cheers!
If you’ve got a pimped out system of your own share it in on the AHA Forum under the Pimp My System category. Don’t be bashful; show off your creativity! Who knows, you could be the next star of Pimp my System…
The AHA Forum is communications central for the homebrewing community. Draw upon the collective knowledge of homebrewers around the world to get your questions answered. Help out your fellow homebrewers with their questions.


Share Post