
Avid homebrewer Paul Blatz was looking to pimp his system when he came across ideas on TheElectricBrewery.com. When building a new house, Paul decided to incorporate a brew room into his home and was able to create a masterpiece of a brew-system, the “Blatzhaus Electric Brauerei.” This system is perfect for avoiding the summer heat in Paul’s south Florida home.
After seeing several electric setups on the Northern Brewer and AHA forum boards, I started doing some research on the pros and cons of electric brewing. With the help of many forum members, I came to the conclusion that there were very few drawbacks and the positives were numerous. During my research, I came across Kal Wallner’s The Electric Brewery, and at that point I was hooked and knew exactly what I wanted to do.
Around the time that I started focusing on an electric brewery, I began building a new house, and incorporated a brewing room set off the garage. Unfortunately, some life events occurred and I wound up not moving into the house, so instead, I set up the electric brewery in my existing garage.
My setup is effectively a near exact clone of Wallner’s The Electric Brewery, with a few slight modifications to fit my brewing style and accommodate the obstacles of south Florida brewing (mainly chilling with 80°F groundwater!).
I purchased the pre-made control panel, electric elements and temperature probes from Kal’s website and did the remainder of the assembly myself—including punching all the holes in the kettles, installing all the elements, HERMs coil and ball valves. I custom built and stained the brew stand to fit my specs and installed casters on the bottom in case I ever needed to move things out to mop up an errant spill, etc.
I did not need to install a ventilation hood/fan setup in my garage like I was going to install in the aforementioned brew room, as I brew with the large garage door open and use a circulating fan. But a ventilation system is in the plans for the future, as I hope to install AC in the garage for summer brewing.
Setup and Operation
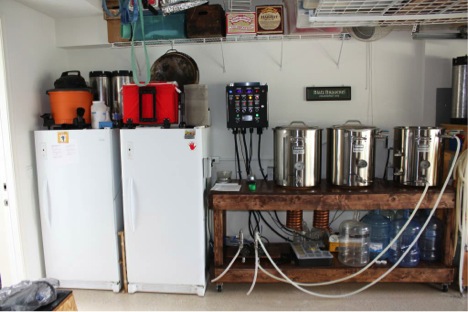
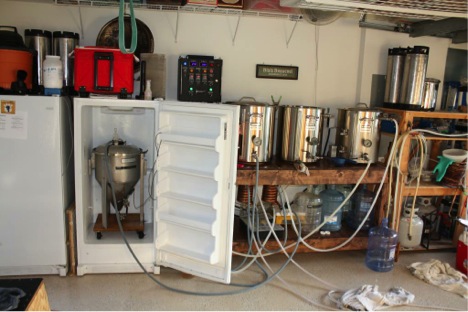
This is an overview picture I took while heating up the strike water. The hot liquor tank (HLT) is on the far right, the mash tun is in the middle and boil kettle on the far left. In the middle is the control panel which uses PIDs to fire the heat elements, as well as control the two pumps located on the shelf below the panel. On the far left are two chest freezers controlled by Ranco temp controllers that house 14.5 gallon Blichmann Conical Fermenters.
Hot Liquor Tank
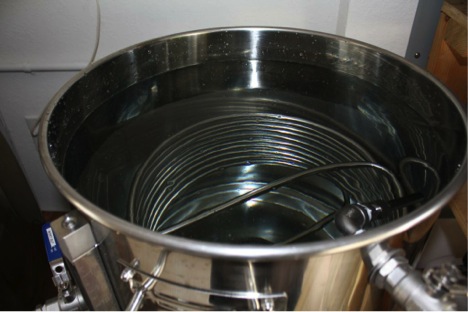
Hard to see but a 5500W ULWD coil is at the bottom of the kettle. Above it is a 50’ coil of SS for the HERMs coil with “out” and “in” ball valves to the left. The ball valve in the upper right hand side of the kettle is the return for the water—the water is constantly pumped and returned to maintain a more homogenous temperature and avoid hot spots around the coil.
Mash/Lauter Tun
The least “altered” of my 20-gallon Blichmann Boilermakers. I employ the standard Blichmann false bottom and then installed a ball valve and 5’ silicone hose to gently transfer the return of the recirculated wort (via HERMs) or to pump in the sparge water.


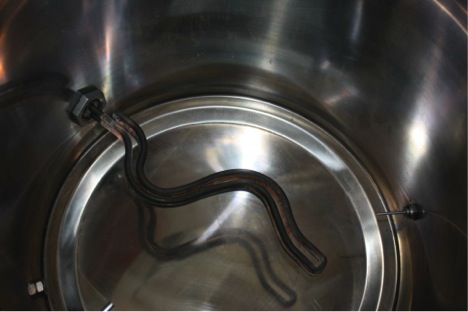
Boil Kettle
Here you can see the heat element installed—identical to the HLT. Also installed is a temperature probe. While all three kettles incorporate RTD (resistive thermal device) temperature probes, the probe for the BK is in the body of the kettle since there is no recirculation whereas the MT and HLT have the probe tied into the output of the kettles in order to measure the temp of the stream of wort or water as it is recirculating.
Not pictured in this picture, but I recently installed a whirlpool return arm with ball valve at the 6-gallon mark. I have tried to move to all pellet hops so that I can perform whirlpools, particularly for IPAs and leave the lion’s share of the hop and break matter in the center of the kettle. When I need to use whole hops I use a hop spider as pictured here:
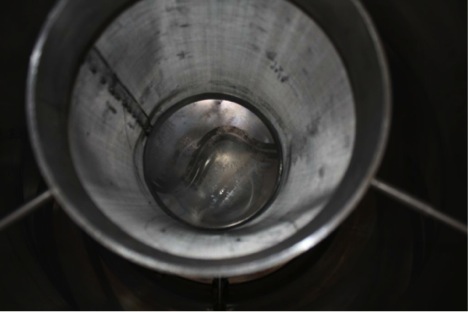
Whole hops go inside the basket and then I pull the basket after the boil is complete. Too many hops tend to clog the screen of the hop spider, so I prefer to be able to use only pellets and whirlpool.
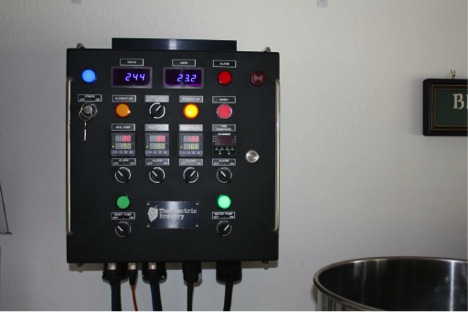
Control Panel
The panel is powered by a 30AMP outlet (with a GFCI in the power cord and in the breaker) which is basically the same as a clothes dryer outlet.
Chilling
I incorporated a two-stage chilling process, where the wort passes through two counterflow chillers before makings its way to the conical fermenter pictured here. Unfortunately, in south Florida, the groundwater is usually around 75-80°F, which isn’t cold enough to drop wort much below 100°F, no matter what chiller you use (I’ve used them all–immersion, Shirron, Therminator).
I settled on Chillzillas since I liked their ease of cleaning over a plate chiller, and one pass of water which is a big plus over an immersion chiller. The first Chillzilla uses hose water on the water side, while the second chiller is fed by a recirculating loop of ice water from the Hot Liquor Tank. I fill the tank with ice (20 pounds for an ale, 30-40 pounds for a lager) and pump it through chiller #2.
I dial back the output valve on the wort pump and check the inline thermometer on Chillzilla #2 to keep my wort temperature about 10°F below where I want to pitch and ferment, that way even with the temperature I lose to the hoses and fermenter, I’ll generally keep my wort right at pitching temp.
Brewday
Heating the Strike Water=
A basic brewday is about 6-7 hours long, dependent on if I do an extended whirlpool with more hops post boil.
I start off with all reverse osmosis water (I use Martin Brungard’s sheet to make all my necessary water adjustments) and put all but about 3-gallons in the hot liquor tank. I hook up the out of the HLT kettle to the pump and then connect the hose to the inlet of the HTL to get it recirculating. Then I set my PID for the HLT to 10 degrees over my desired strike temp, turn the element to on and start weighing and crushing my grains and water salts.
Mash In
Once the strike temp +10 degrees is reached (usually about 20 min), I connect the hoses from the mash tun outlet to the pump and then to the HERMS coil out and input, and finally to the mash tun input. I then pump the strike water over to the mash tun, and let it recirculate for a few minutes to even out.
Then I lower the HLT PID to my mash temp and add the missing 3-gallons of water to the HLT to bring the water inside the HLT down close to my mash temperature. Meanwhile, I add my grist and water salts to the mash tun, stir for a few minutes and then begin recirculating through the HERMS to maintain a constant temp.
After an hour, I begin ramping up for mashout, by changing the temp on the PID for the HLT to 168°F.
Run Off
Once the mash is at 168°F, I take the hose that is connected from the mash pump “out” and disconnect it from the HERMs coil “in” and place it in the bottom of the boil kettle. The wort is now going to be pumped into the boil kettle rather than recirculated. Instead of returning the water in the HLT, I disconnect the hose to the return on the HLT and put it in the “in” of the HERMs to flow the sparge water to the mash tun as well as clean out the inside of the coil with hot water.
I dial back the ball valves on the “Out” of both the mash and water pumps to be about equal for sparging and keep a close eye on the water level to keep that consistent. I try to make the sparge last for about 45 minutes or so. I usually collect about 15-gallons for a 12-gallon batch and 90 minute boil.
Boil
Once the wort level is covering the heat element in the boil kettle, I switch the power to the boil kettle element and begin firing up to a boil.
Once a boil is reached, I dial back the output of the heat element to keep a rolling, rather than a “jumping out of the kettle” boil.
During the boil, I generally clean out the mash tun and any other used tools, as well as hook all the hoses up for the chilling system.
About 15 minutes prior to the end of the boil, I begin recirculating the boiling wort through the chilling system (no chill water running at this point of course), returning it to the kettle via the whirlpool arm.
Post Boil
Once the boil has completed, I shut off the heat element and chill partially with just the hose water chiller (#1) to drop the wort to 180°F to retard hop isomerization and then let the wort recirculate for 30 minutes to drop out as much particulate as possible.
If I used the hop spider, it would have been pulled prior to whirl pooling.
If this is a hoppy beer, I would chill to only 190°F and would not turn off the element and set the element’s PID to 190°F to maintain that temp during the whirlpool since I do still want to the isomerization to continue and I chose 190°F to keep it at a level I can be consistent with from batch to batch. I would whirlpool here for at least 45 minutes.
Runoff to Fermenter
After whirl pooling, I let everything settle for 15 minutes, then turn on the hose and pump for the ice water recirculation out of the HLT and take the wort hose from the whirlpool connection and put it directly into my sanitized conical (as pictured in the last pic).
Again, I use the ball valve on the “out” of the wort pump to hit the temperature I want.
Once the conical is filled, I aerate, pitch and begin cleanup, reusing the runoff water from the chiller to clean the BK with some PBW and elbow grease.
That’s it—would love to help any others out there who have questions. Cheers!


Share Post