When I began brewing, I started with an extract kit and some basic equipment, like I’m sure most of us did. Well, after my first batch, I was hooked. And I wanted to take it a step further. My second batch was all-grain. I already had the drink cooler that I could convert into a mash tun and sizeable boil kettles. The only piece of equipment I needed was something to stir the mash with. Sure I had kitchen spoons, but all of them were too small. I needed a mash paddle.
I started shopping around and was astonished to find wooden paddles in the ballpark of $60! Being somewhat of a do-it-yourselfer and, shall we say frugal, I decided I could come up with something that would not only work well, but that I could be proud of as well.
 Materials:
-1” x 4” x 36” piece of hardwood (3/4” x 3.5” x 36” dimensional) – less than $10
-Butcher’s Block Oil or Pure Mineral Oil (optional) – $3-$5
Equipment:
-Drill (drill press works well) and spade bits
-Band Saw, Jig Saw or small hand saw (something to cut out the shape with)
-Sandpaper
-Router
The Design
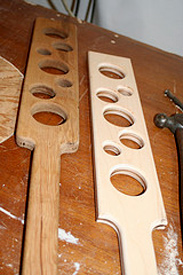
There are several elements of the design that need to be considered before you get started. First, choose a piece of hardwood for this project. You want something like hickory or maple, because it has small pores and is a dense wood. Do not use any type of cedar or pine. They are soft and will not fare well. The sap in the softer wood will also release off flavors and other “bad” things into your beer. Every paddle can, and should be unique. It can be very simple or as intricate as you want. Basically, it is yours and it should be something that appeals to you right? My design consists of nothing more than different sized holes cut into the blade. These are easy to make with a drill and the appropriate bits/saws and serve a purpose. I believe form follows function, and the different sized holes effectively break up dough balls in the wort and allow the wort to flow through at different rates, causing it to mix thoroughly. I’ve even seen elaborate designs that are laser cut. Whatever design you choose, don’t sacrifice it’s functionality for something that looks cool. You also want to stick with something that is easy to clean when you’re finished.
The Build
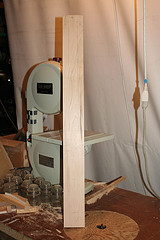
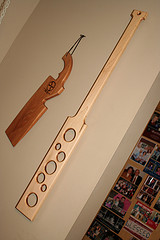 Once you have chosen your piece of wood, trace your design onto it. Here is where I get a little particular. I like to use a carpenters square and rulers to make sure everything is straight and true. Once traced, the design is cut out. Use the hole saw to cut out the holes in your paddle first. Tip: you can also use larger drill bits at the corners of your handle so you only have to use the saw to make straight cuts. You may also want to add a small hole to the end of the handle so you can hang it on a nail on the wall of your brewery too. Finish by cutting out the shape of the handle and any other parts of the design that remains. When I’m done cutting out my design, I use a router with a simple rounded bit to round off all of the edges of the paddle. This is not required but it really makes for a nice looking finished product. Once you are done shaping your paddle it needs to be sanded smooth. Start with 60 grit sandpaper and work your way up through 100, 150, and 200. You can do this by hand or with a power sander, either way works fine.
The Oil
 Here is where some opinions differ. I give my paddle a coat of oil to seal the grain. I do this at least a week before I brew so that it has soaked in and dried. I also do this after each brew so that it is ready for the next time. Some prefer not to use oil because it may cause head retention problems, however I have not noticed any issues. Basically, you can try it and see if it works for you. Do not, however, use any varnishes or stains. These chemicals WILL find their way into your beer, and you don’t want that!
A Couple of Extras
If you make the blade of your mash paddle tall enough, it can double as a measuring stick for your boil kettle. You can make hash marks along the edge with a saw or even use a permanent marker. The permanent ink is not water soluble, so it should not affect your beer. Your wooden paddle can also help prevent boil-overs. If you rest your paddle over the top of your kettle during the boil, it should help prevent boil overs the same way a wooden spoon does while boiling in the kitchen. It may not stop it 100% but it could give you enough time to deal with it before you have a huge mess on your hands.
So, with some basic tools, and a little time, you can have a quality mash paddle without breaking your brewing budget. Cheers!


Share Post