After a colleague shared a homebrew in 2006, Lee was hooked on the idea of being able to produce beer at home for a reasonable price, with flavors and aromas he had never experienced before. Two years later, Lee introduced homebrewing to his friend and fellow classmate, Taylor, who had experience in winemaking but had yet to test the waters of brewing beer. The duo brewed together for some time, but a combination of priorities involving school, family, and work forced their new passion onto the back burner.
After their hiatus, Lee and Taylor decided it was time to get back into homebrewing, and that they needed to step up their game. The jump to all-grain and the slew of new equipment that came with it marked the second chapter of Lee and Taylor’s journey. Their brew days went well and their process seemed tight, but they were stumped when two of their final products that seemed to go without a hitch were exhibiting off-flavors. This sent Lee and Taylor back to drawing board…
 The first time we sensed the off-flavors, we were stumped. We were still new to homebrewing and didn’t quite realize the importance of temperature control during fermentation, so we wrote it off as something due to sanitation. The second time it happened, we knew our sanitation practices were on point and started to do some investigating. It was then that we realized we had to control our fermentation temperatures. But how were we going to do this? We wanted to keep the cost on the lower end as our brewing budget was not that great.
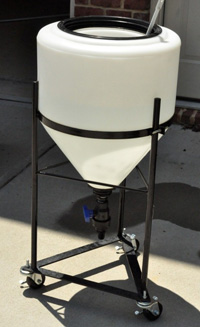
We were able to acquire two 15 gallon plastic conical fermenters off of craigslist for the amazing price of $75. So now what? We have the capability of fermenting at least 10 gallons at a time in one vessel, but how are we going to regulate the fermentation temperatures? We looked numerous online homebrew forums for solutions. It seemed like everything we came across involved placing the conical in a fridge/freezer of some sort or a chamber with an A/C unit. We were limited on the amount of space, and again, trying to be budget conscious, we decided to put our engineering minds to work and be a little creative. Then it dawned on us… we use an immersion chiller to cool down the wort after boiling, why couldn’t we use this same concept to regulate the temperature in our conical? We decided that this was the route that we wanted to go and wanted to see if we could make it work. Enter the conical immersion-temperature-controller-thingy.
The Three Main Parts to Our System
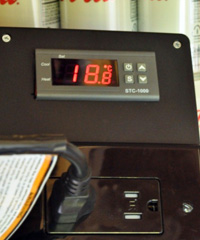 The temperature controller: which enabled us to independently control a heating or cooling cycle to remove or add heat to our system. We had to keep it cheap and simple so instead of purchasing one of the expensive temperature controllers often found on the brewing vendor websites we used an aquarium thermometer found on eBay (idea credit to homebrewtalk.com). The temperature controller fed into a basic home outlet with independent leads, one terminal triggered the cooling cycle when the temperature probe of the aquarium temperature controller read too warm and the other terminal triggered the heating cycle when the temperature probe read too cool. All of this was neatly mounted in a project box which was purchased at radio shack.
- The chilling system: This was undoubtedly the part of our system we put the most thought into. We first thought we wanted to use a freezer/refrigerator that could potentially house our entire conical…that was too expensive and took up too much room. We then went through a phase of looking for chest freezers to house chilling solutions… again, too expensive and took up even more room. Lastly, and again back to our budget conscious wallets, we decided to simply use a spare cooler that we had to house an ice bath.
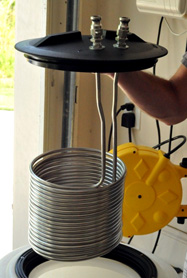
- The pump: Using a submersible pond pump hooked to the cooling side of the temperature controller, we could efficiently pump chilled water out of the cooler. To transfer the chilled water into the conical to remove the heat we decided on using 3/8” stainless steel wort chiller (50’) attached to the lid of the conical so that we could easily remove it for cleaning and sanitation. The wort chiller was attached to the lid on the underside using a compression fitting bulkhead. The top of the bulkhead had Cam Lock disconnects so that we could more easily disassemble and sanitize after fermentation.To get the chilled water into and out of the cooler we drilled two holes at opposite ends of the cooler. This was done in an attempt to maximize the mixing of cool and warm water as the chilled bath exits and the warm water returns from the conical. To transfer the water we used vinyl reinforced tubing purchased from our local hardware store. The reinforced attribute of the vinyl wasn’t necessary but we thought it may lend more insulation than the thinner alternatives. In addition, we bought foam tube insulation that we wrapped around the respective lines.
 The Result
All-in all, when complete, the system functioned much better than we ever expected. We placed water and ice in the cooler, submersed the pump, attached it to the cooling side of the temperature controller, turned it on, set it to 17.3°C +/- 0.5°C and let it go.
After the initial cool down we never saw a temperature greater than 17.8°C. When the pump turned on at the high end of 17.8°C it would take no more than five minutes before the temperature was back to 17.3°C and the pump shut off. The heat of fermentation and ambient outdoor temperature of 80°F would take the temperature back to 17.8°C and the process repeated.
Our only issues were the level at which we had to elevate the pump to work efficiently and the fact that we had to add additional ice nearly every day. To address the first issue we are adding a higher flowing pond pump which will up our flow rate from 158 gallons per hour (GPH) and a lift of 3.6’ (height to which it will pump) to 620 GPH and a lift of 11.5’. To address the adding ice issue we are substituting our ice bath in a cooler for a 1.7 cubic foot dorm room refrigerator with a custom built cold water enclosure that the new pump will sit in.


Share Post