
Which is better, bottling or kegging? It’s one of the great homebrew debates, right up there with extract vs. all-grain and batch sparging vs. fly sparging. Both bottling and kegging have their advantages and disadvantages, and both can be onerous at times. Peeling labels off of used bottles is one of the worst tasks in homebrewing. But in the frustration department, finding a CO2 leak in your system when the beer is already in the keg is right up there.
I find that most homebrewers are strongly in one camp or the other. But I straddle the line, happily kegging or bottling each batch as my mood and circumstances guide me. And to be honest, I actually enjoy the bottling process more than kegging because I have found the five paths to bottling nirvana. But this wasn’t always the case.
Seventeen years ago, after just my third time homebrewing, I went out and bought a humongous, 1960s era, avocado green refrigerator and a very used CO2 bottle. Add to that a few used soda kegs, some fittings, hoses, and a picnic tap, and I was out of the bottling business for good. I hated bottling—the sanitizing, the filling, the capping. The chore of bottling was way more effort than I was willing to put into even this, the most satisfying of hobbies.
Fast-forward to two years ago. My lovely mate had made the executive decision that the avocado monster had to go. I admit it was nasty from years of neglect, and supremely ugly. It had seemingly permanent beer and wort stains from keg leaks and fermenters blowing off airlocks. It wasn’t frost-free and made an incredible mess when it was defrosted. And it was starting to stink. To top it off, I was in the middle of a long brewing hiatus, so I agreed it was time to say goodbye to my old friend.
 Despite being in this kegless period of my life, my neighbor, Dan, was insistent that I teach him how to brew. I was forced to return to bottling until the avocado beast could be replaced. So when packaging time arrived for our first brew together, I used the same techniques that I had used well over a decade-and-a-half earlier. I cleaned the bathtub and then filled it with hot water and bleach. I sank our bottles in the tub and let them sit to sanitize. Finally, I rinsed each bottle with fresh hot water to remove the bleach. Already, this was becoming a chore.
The actual process of capping was even worse. I pulled out my metal two-lever capper and we got down to business. With every cap, I remembered why I hated bottling. The capper was unwieldy when operated by one person. It desperately held onto the top of each bottle after crimping the cap, to the point that it seemed the bottle would break when enough force was applied to disengage the capper. I was frustrated and decidedly not having fun. I knew that a new kegerator was not going to be appearing soon, but Dan and I wanted to continue homebrewing. Until my kegging setup was reestablished, I had to improve my bottling process.
The First Path: Rinse-Free Sanitizer
Sinking the bottles in bleach water and waiting—that’s easy. But the endless rinsing afterwards, that had to go. I don’t know why, but up to this point, I had always used bleach as my sanitizing agent rather than using one of the many commercial sanitizing products available. I think I always viewed commercial sanitizers as an unnecessary expense. I know that bleach isn’t really all that effective as a sanitizer, but it’s cheap and easy, right? Well, it’s not really easy when you have to rinse the sanitizer away. In fact, the rinse water is really a possible source of contamination that I was applying to my freshly sanitized bottles. Bottling would be so much easier if I could just dump out the sanitizer and let the bottles air dry.
To that end, I went to my local homebrew shop in search of a rinse-free sanitizer. The shop had a few different products available and I ended up buying a bottle of Five Star’s Star San. When diluted properly, Star San sanitizes surfaces by just wetting them and letting them air dry. And, since it is food-grade, I don’t have to worry if my bottles are still a little wet when I’m ready to use them—this is a true rinse-free product. My frustration level was already starting to subside.
 The Second Path: The Bottle Tree and the Sulphiter
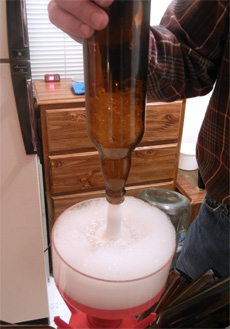
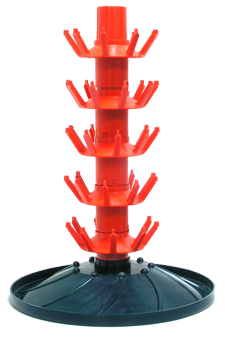
Now that I eliminated the need to rinse sanitizing solution out of my bottles, I wanted a better way of applying that solution. Sinking bottles in a big container of sanitizer started to seem like a lot of effort and a serious waste of sanitizer. Besides which, my wife banished me from using the bathtub for sanitizing bottles (wisely so; it does seem kind of gross). Fortunately, Dan, the neighbor who was accelerating my brewing schedule, also helps out occasionally at the Winter Park Winery in Winter Park, Colo. Dan had the bright idea to borrow one of their bottle trees and a sulphiter that they use for sanitizing wine bottles.
A sulphiter is essentially a bowl equipped with a spring-loaded squirter pointing straight up from the center. This one fit right on top of the bottle tree. We poured a few cups of sanitizer into the sulphiter, inverted each bottle and pressed it down over the squirter. The sulphiter sprayed sanitizer all the way up into the bottle. With three or four squirts, the entire inner surface of each bottle was wet and we could hang the bottle on one of the bottle tree pegs to dry. Amazingly simple and fast. I can’t believe I had never done this before. Dare I say it? I was even having fun.
The Third Path: The Bottling Bucket
This one probably seems like a no-brainer to all you veteran bottlers. But I never used a bottling bucket in those early days before kegging, simply because I didn’t have one. Instead, I siphoned my uncarbonated beer from a carboy into a fermentation bucket that already held my priming solution. Once that was mixed, I siphoned again into bottles. Now I like siphoning as much as the next guy, but establishing and maintaining a siphon while filling bottles is a royal pain. A bucket with a spigot at the bottom is just the ticket to eliminate siphon complications from the bottling process.
 The Fourth Path: A Decent Capper
By our second batch together, Dan had procured his own brewing equipment. When we bottled that second batch, we used Dan’s “deluxe” plastic, two-lever hand capper. It was one of those red, blocky things that just looks cheap compared to my chromed hand capper. Well, nothing could be further from the truth. His capper was deluxe indeed. We flew through the bottles with the capper crimping and releasing with ease. No wonder I had hated bottling so much—I had a crappy capper that was making my life harder.
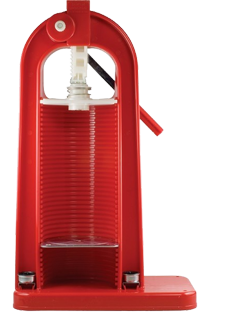
While the deluxe hand capper was working great, it was still a bit unwieldy for one person to operate since the capper required two hands and good aim to prevent knocking the cap off before it was crimped, or worse, crimping it on crooked without making a good seal. Since I was actually starting to have fun with this whole bottling thing, I decided to invest in a bench capper to address these issues. I ended up buying a used, free-standing Super Colonna capper. Oh my, now we were in business. As with other bench cappers, the Super Colonna requires only one hand to operate, leaving a hand free to stabilize the bottle being capped. The capping action is smooth and the capping lever requires very little force to get a cap crimped on properly. And, as with any good bench capper, the Super Colonna is adjustable to fit a variety of bottles. I’ve used mine with bottles anywhere from 8 ounces to 750 milliliters. But most importantly, the Super Colonna makes capping fun.
The Fifth Path: Bottle Love
I used to think that one of the advantages of kegging was the ease of sanitizing kegs as compared to bottles. But with rinse-free sanitizer, a bottle tree, and a sulphiter, bottles are even easier to sanitize than kegs. There’s no breaking down the parts and checking the gaskets—just squirt in sanitizer and hang to dry. But this is only true if your bottles start out clean. That means that you need to give your bottles a little love after each use. Each time you open a homebrew, be sure to immediately rinse out the dregs from the bottle. Don’t wait until the next day, because that will inevitably end upbeing next week, and eventually, “Oh well, I’ll just get to it right before I bottle.” We all know what happens then—dried gunk and probably some mold that stubbornly refuses to come out of the bottle without chemicals or elbow grease. Ideally, you only want to put effort into cleaning a bottle the first time you procure it. After that, rinsing and sanitizing are generally sufficient to keep your bottles in good shape for homebrew. And while you’re doing that initial cleaning, do yourself a favor and remove the labels. I know it’s a pain, but you only have to do it once, and it says a lot about the respect you give your brew. And if you don’t respect your beer, who will? Give your bottles a little love, and they will love you back with good performance for years.
I now have a new kegerator humming along with two kegs on tap. But I still bottle most of my beers rather than keg them. Improving my bottling process in the five ways described above, I have discovered the joy of bottling. I will probably always keep a keg or three handy, but my heart is really in my bottles. There’s a carboy of Belgian wit with lemon thyme calling to me now, so I think I’ll go start the primer boiling.
Will Trice homebrews outdoors in his Aurora, Colo. backyard. He has produced Will’s Swill off and on for 18 years, occasionally creating something palatable. He recently discovered that he is a rain god and can produce precipitation by merely setting up his brewstand.


Share Post