
This homebrew system project was submitted by AHA member Chris Allen. Calling Nashville, Tenn. home, Allen has immersed himself in the vibrant homebrew and craft beer community in Music City, and is dedicated to mastering the art and science of beer making.
Share your DIY homebrewing projects on the AHA Forum or shoot us an email, and we might feature it on HomebrewersAssociation.org!
History
My success in homebrewing comes from my desire to create and build things. I am a perfectionist and take hobbies to their extreme. I didn’t always want to homebrew, but always enjoyed drinking great craft beer with my wife, her family and friends.
About four years ago, my wife and I purchased her dad (a chemical engineer) a basic homebrew kit for Christmas. After several extract beers had been brewed by my wife and her father, I decided to join in the fun.
My previous hobby consisted of building synthesizers for my music studio located in a 5’x10’ converted laundry room. This same laundry room would later become what is now my 20-gallon HERMS electric brewery.
After months of carefully measuring, drawing and speculating, I made the plunge and ordered my system. When I received everything, I barely had enough room for the brew stand, kettles, work table and a commercial sink.
The Challenge
Having purchased two 14.5 gallon conical fermenters, I knew that my garage was the next logical space to spill into. In order to park a car in our garage, purchasing the correct size refrigerator fermentation chambers was key.
It turns out, the same glass door refrigerators that you buy a soda out of in a convenience store, True GDM-12, were a perfect fit for the garage wall and the conicals. I installed casters onto both refrigerators to make it easier to shift beers around during primary or secondary fermentations. I didn’t realize how awesome using a glass door refrigerator as a fermentation chamber would be—being able to visually see active bubbles in the blow off container is a nice luxury.
I initially connected the two refrigerators to their own Johnson Control A419 controllers, but was never truly happy with them. I didn’t like that they were only single stage, which meant I had to take off the cover to switch it to heating when necessary. In the fall or early winter this presented a challenge due to temperature fluctuations mid-day.
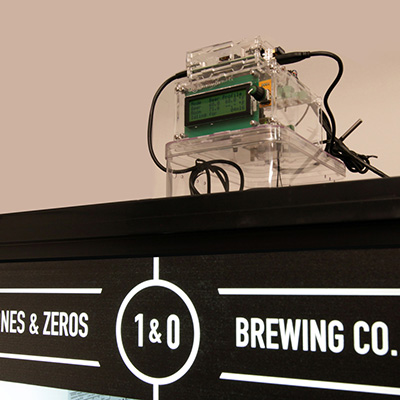
The Solution: BrewPi

With my background in electronics and love for computers, I decided to take fermentation to the next level using BrewPi controllers. BrewPi controllers consist of an Arduino, Raspberry Pi, solid-state relays and other breakout circuit boards. They are basically fermentation controllers on steroids.
While most PIDs function to control the mash in HERMS or RIMS type setups, BrewPi incorporates its own PID algorithm to control fermentation. Without a doubt, BrewPi can hold active fermentation within a tenth of a degree. I almost can’t believe the accuracy of control I am able to achieve with BrewPi.
Need a diacetyl rest? No problem. Having trouble getting your pitching temperature precisely? No problem. Want to do crazy multi-step temperature profiles over several days? No problem. The BrewPi is so dynamic and consistent that the resulting quality in my beers has been amazing.
I currently have three temperature probes connected to each BrewPi. The first probe placed inside the conical thermowell reads the actual beer temperature. The second hanging in open air inside the fermentation chamber reads the chamber temperature. The third sits on top of the BrewPi case to monitor the ambient air temperature inside my garage.
BrewPi is managed through a web interface. I can be sitting in bed and watch the linear graph showing the temperature of the fermentation chamber and the thermowell. With BrewPi, you can start and stop fermentation control using the web interface. Temperature profiles can easily be downloaded for backup or Excel manipulation.
Building a Single BrewPi Chamber + Fermenter
Materials
- True GDM-12, 1 Door, Glass Swing Door Refrigerator | (new) WebstaurantStore.com or (used) Ebay.com or CraigsList.org
- Stout Tanks and Kettles 14.5 Gal. Conical Fermenter with 3″ Tri-Clamp Port in Lid | Conical-Fermenter.com
- Complete BrewPi RevC Kit with shield kit and 3 temp sensors + Acrylic Case | BrewPi.com
- Kids Shoe Box, Item#10048429 (to house the solid state relays and USB hub) | ContainerStore.com
- Raspberry Pi Model B 512MB RAM | AdaFruit.com
- Arduino Leonardo ATmega32u4 with headers | AdaFruit.com
- Belkin Hi-Speed USB 2.0 4-Port Hub, Manufacturer#F5U234VSN (to power the BrewPi, Arduino, and RaspberryPi) | Officemax.com
- 15’ Category 5e Wire (temperature probe wiring harness) | Lowes.com
- 5’ 14AWG Wire (refrigerator compressor and fermentation chamber heater connections) | Lowes.com
- Bag of 14AWG Plastic Wing Wire Connectors | Lowes.com
- Project Source 15-Amp 125-Volt Black 2-Wire Male Connectors | Lowes.com
- Project Source 15-Amp 125-Volt Black 2-Wire Female Connectors | Lowes.com
- 25’ Southwire 14-2 SJOOW 300 Volt Black | HomeDepot.com
- Box of various size heat shrink | Lowes.com
- Lead or Lead-Free Solder | AdaFruit.com
 Tools
Tools
- Soldering iron
- Wire strippers
- Wire crimper
- Dremel with cutting bit
- Phillips screwdriver
- Flat head screwdriver
- Hot air gun
- Drill with drill bit set
The Build
Modifying the fermentation chamber was quite challenging. Even though soldering the components and circuit boards from the BrewPi kit took very little time, soldering and routing the wire connections in and around the refrigerator was very time consuming. The overall BrewPi build for one refrigerator took anywhere from two to three evenings.
There are so many ways you can connect a BrewPi to your refrigerator. I took what might have been the hardest route and re-routed wires through the refrigerator floor and wiring harness channel. I also modified the original thermostat cover plate and drilled three holes, one for the heater connection, and the other two for the thermowell and fermentation chamber temperature probes.
The process of incorporating a BrewPi into any fermentation chamber project is as difficult as you want to make it. The easiest route would be to connect the solid state relays to standard wall plugs, similar to how a STC1000 is wired for temperature control. Once the BrewPi kit is built, the Arduino and RaspberryPi will need to be configured. Brewpi.com has great detailed instructions on how to do this.
Conclusion

BrewPi has greatly improved my beer fermentation process. It’s nice to be able to go back to a beer that I fermented and review the temperature steps. Access to the BrewPi data allows me to improve my beers and easily repeat recipes. I am very pleased with BrewPi and encourage anyone to build one!
Share Post