I’m always on the lookout for ways to improve my brewing processes without breaking the bank. Most recently, I’ve had my eye on the popular hop spider DIY project. This innovative design suspends a hop bag in the boil, allowing access to the opening of the bag at any time. All hop additions are added into this one hop bag. Once the boil is over and you are ready to rack to primary, simply pull out the hop spider and you’re left with hop sediment-free wort.
Initially I set out to build a “fancy” hop spider, like the ones you’ll see when searching Google. As I was walking around the local hardware store collecting materials, it dawned on me that I could basically put together something just as functional, but for much less money. Five dollars later I had myself what I dubbed “the poor man’s hop spider.”

I purchased one 3.5-foot piece of 5-millimeter threaded metal rod which I cut in half and four “bulldog” binder clips from the hardware store for a total of $5. I already had a large muslin bag in my brew closet and two standard binder clips which were donated to the cause. You can substitute the metal rod segments with two long, metal grill skewers or spoons. Really anything that can withstand heat and can sit steadily across the diameter of the boil pot will work.
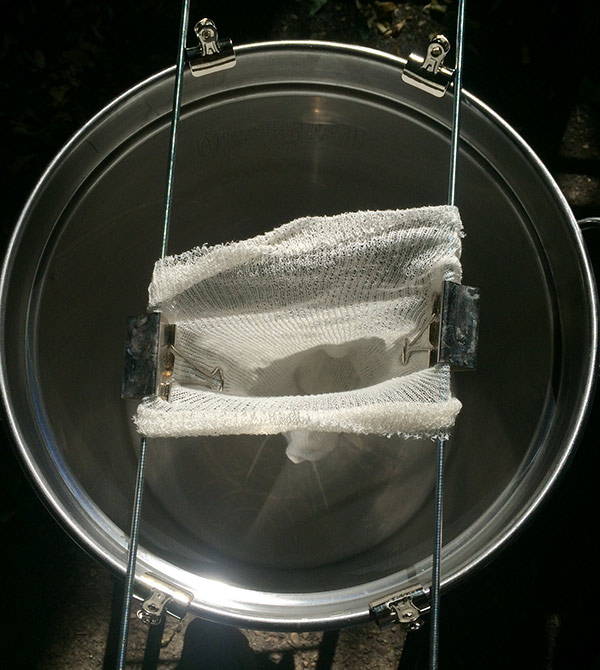
To set up the poor man’s hop spider, start by placing the two metal rod segments so they are sitting on the rim of the boil kettle. Next, secure the hop bag to one of the rods using one standard binder clip. Secure the other side of the hop bag to the other rod with the other binder clip. Last, separate the rod segments so they are about a half foot apart and clip the bulldog binder clips to the rim of the kettle so the rods cannot slide towards each other. See the picture for clarification.
That’s it! Be sure the hop bag is long enough that a good portion will be submerged during the boil. Then simply add all of your hop additions into the suspended bag, remove the hop spider when you’re ready to rack to primary and watch the sediment-free wort flow into your fermenter.
One day I will build a fancier, more robust hop spider, but for now this frugal alternative will do just fine!

Share Post