Bryan has gone through a tremendous amount of time and effort to build the brewery of his dreams (at least for now)! It’s pretty amazing what someone with a lot of passion can accomplish in only a few years with hard work, dirty hands and a vision. Here’s Bryan’s story:
Well this obsession all started out in the early 2000’s when I got re-gifted a Mr. Beer kit that my dad had got as a present. Now what you don’t know about me is that I take everything to the extreme. Why? I hate following the norm. Up until the first batches with Mr. Beer, I was a 21yr old beer drinker who didn’t really like beer. It was such a fun and new experience, and I remember reading the instructions literally for days before I brewed. I remember watching the Mr. Beer keg churn for a few days, and just being in awe of what was going on. I will never forget bottling that first batch; it seemed like ages ago it made this monstrosity.
My attitude towards beer changed the day I drank my first homebrewed beer. I didn’t particularly LOVE this beer I made, but I made it and that was just plain awesome. It also opened my eyes to beers other than the typical light American lagers. I brewed about 5 of the kits, before I realized they all kind of tasted the same. I did some internet research on Mr. Beer and brewing alternatives, and to my surprise there were two major players in the homebrew game right here in Minnesota (Midwest Supplies, and Northern Brewer). Since Midwest Supplies was closer to me I decided to go there and see what it was all about. Upon walking in I was blown away by all the stuff that was there (I had never seen or heard of about 95% of it). I told them what I had, and what I was experiencing. Let’s just say I left Midwest about $600 poorer that day, with visions of making the best beer in the world. I now had a ton of equipment, and my first real extract kit, an Irish Red. I once again read the instructions over until I could recite them. I brewed that first batch, and in what seemed like an eternity passed, finally got to have a taste. I heard choirs singing and the earth stood still. This beer was the best beer I have ever had! I only did one batch of extract, because of my extreme nature kicked into high gear.
I went back to Midwest about a month later, and said I want to make the best beer possible and how I would do it. All grain was what was brought up, along with lagers, and once again I left Midwest with a lot less money. I started acquiring parts to make a brew system, because I was told that the key to all grain is consistency. So in my head and still to this day consistency is what I am all about. I acquired a few sanke kegs, a cooler and re-purposed some fridge controllers to serve as my controllers for my system. I have always hated gas, so I knew this system would be all electric. I installed a 30amp dryer outlet in the garage and I was off. It took me a few weeks to put together the system (I had never brewed all grain before so I had to get the entire process down so I could put the system together properly). I finished the system and brewed my first all grain beer, a light lager ( hah!). It actually turned out really good, and I was hooked.
Let’s fast forward to 2007, my wife and I moved to a new house and I had grand visions of a brewery in my basement, along with all the fixings. By this time I had a hundred or so batches of all grain under my belt, was kegging, lagering, making starters, making my own water from scratch, and competing. I started finishing my basement soon after we moved in, and had been eyeing the basement utility room for quite some time. I also wanted to upgrade my brewery with something. I had heard of a new brewery controller called BCS, from embedded control concepts here in MN. I spoke with them and it seemed like a great fit, and I was one of only a few trying it out. I instantly fell in love with it, allowing for a touch screen controller and web access. I was even able to control it from my phone. It was so cool being able to go to the store while mashing and check my temps.
I brewed A LOT of beer with that system. The goal always was to sell our house in a few years, so I tried to make things not permanent, but comfortable for me. Well with the housing market in the dump, and failed attempts at selling our house we decided to stay. Since we decided to stay, that signaled the green light to my home brewery dream. So construction began! All of the home’s ventilation, plumbing, and an electrical panel had to be moved (no easy task!). I am a DIY’er with just about everything, so I started the slow process of getting all the stuff out of the way so I could have a clear area. I ran into a major hurdle when I had to move the sump pump (I could only move it so far without knocking out the whole floor – sadly it was actually an option) so I could add drains. I decided to just redo the brewing setup and go to use the traditional 3 vessel approach. After figuring all my walls and spaces I had come up with a finished space of 36” for a brewing system; time to get creative. I had seen the schematics for a system called Brutus 20, and it really intrigued me. I wasn’t aware of too many that had tried it; being that I push the envelope, and uncharted territory are my thing, I embraced it fully! I came up with some changes to the design so it would fit my criteria, which was:
• 100% stainless
• Brew in the shortest amount of time (i.e. conserve power/electricty)
• Hard plumbed and clean in place
• As close to fully automated as possible (that consistency thing again)
• As small of a foot print as possible
• Electric
• Being able to brew 5-20g batches
• Heat exchanged recirculating mash system (HERMS)
• A professional fit and finish
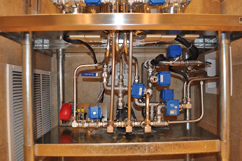
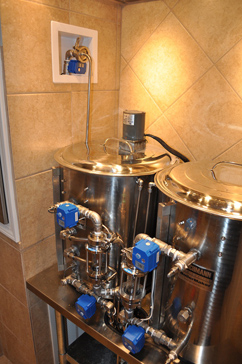 So, I then set about to start sourcing parts, (eBay and restaurant equipment auctions was where I got most of the parts). By far the most expensive part of the build was the kettles – which are Blichmann Engineering Boilermaker 20 gallon pots. I got the Range hood and brew stand at an auction for under $10 (my personal favorite!) The rest of the hardware basically came from eBay, minus the electric ball valves, and the heart of the system the “Brewtroller”, which is an amazing stand alone brewing control system for the do-it-yourselfer. In regards to the brewtroller, I want to thank all the guys that helped me with getting this thing running with the software, we were all kind of in un-charted territory and without them this would still be a pile of parts.
So for a parts list we have:
• 1-20gallon blichmann boilermaker HLT/Boilkettle with pressure sensor, sight glass, removable herms coil and heating elements
• 1-20gallon blichmann boilermaker Mash Tun with pressure sensor, sight glass, and a custom false bottom
• 100’ of 304 ss tubing (50’ for herms coil and 50’ for the rest of the parts)
• 1 little giant 3-md-hc 1/12hp 750GPH pump (compared to march at 270gph)
• 12-12volt electric ball valves
• 2 pressure sensors
• 2 sight glasses
• A Hot liquor tank stir motor to keep water at an even temp
• 1 brewtroller V3 controller
• 40plate plate chiller
It also features 11k watts of heating power, hard plumbed hot and cold water, 2-20 gallon reverse osmosis storage tanks, a dedicated computer, 1200cfm range hood with makeup air, custom false bottom, dedicated 32” monitor, fully finished room with audio and video, and dedicated ip camera.
 How I Brew a batch of beer:
The controller allows me to import recipes via BeerSmith to the controller, when that is done it knows all of the water volumes and temperatures needed for the brew session. Once imported, I have the option to brew now or set a time to start brewing.
Once it’s time to brew, the system turns on the fill valve from the reverse osmosis system opens, and in conjunction with the pressure sensor fills the hot liquor tank/boil kettle until it determines the proper water amount. When proper water amount is hit, reverse osmosis fill valve shuts, and the system automatically starts to heat the strike water. With 11k watts of power, I see about 9-11°F per minute raise on water heating, which is about 10-15 minutes from tap to strike. The stir motor is also on right now to aid in getting even temperatures.
Once strike temperature is met the system auto fills the mash tun with the proper amount of strike water, and prompts me to add the grain to proceed to the next step. I add the grains, stir well and hit the proceed button, and the controller takes it from here. I generally step mash all my beers.
While in “mash mode” the controller really shines (basically it uses a PID controller to maintain mash temperatures to .5 of a degree). Since I am using a HERMS based system the pump is always on recirculating the wort, but how my system differs is how it maintains its temperatures. If the temperature is low is will flow out the mash tun into the HERMS coil then back to the mash tun, if temperature is at or above temperature it will divert flow to bypass the HERMS to cool itself back down.
Once mashing is complete, I pump the remaining water in the hot liquor tank/boil kettle to the mash tun and do a 10 minute recirculation. That’s the only “sparge” I can do with this system, but it nets about 70% efficiency. Once everything thing is homogenous in the mash tun, then the entire volume is then pumped to the hot liquor tank/boil kettle.
Once in the boil kettle, the controller will give it full power until the kettle hits 206 °F, then it starts throttling the elements to make sure no boil over will happen. Once the controller is past the boil over stage it will settle in at a power percentage (for me that’s 40%) . With 15 minutes left in the boil the controller will fire up the pump and do a sanitizing (with boiling wort) recirculation though the plate chiller. When boil timer expires, the controller kills the power to the elements, opens the cold water to the plate chiller and starts pumping chilled wort into the fermenter.
To clean my system I just scoop out grains, shop vac all the little bits, and open up all valves and flush with Hot tap water. Once pretty clean, I then dump in some PBW and it goes into its own cleaning cycle, which is almost exact to a brewing session.
Congratulations to you Bryan for sticking with your dream of building a brewery that you can be extremely proud of. It truely is inspiring to countless homebrewers accros the globe to one day create something as you have. Well done and keep brewing!
If you’ve got a pimped out system of your own share it in on the AHA Forum under the Pimp My System category. Don’t be bashful; show off your creativity! Who knows, you could be the next star of Pimp my System…
The AHA Forum is communications central for the homebrewing community. Draw upon the collective knowledge of homebrewers around the world to get your questions answered. Help out your fellow homebrewers with their questions.
Share Post