Unless you’re using the brew in a bag technique, a mash tun is an essential piece of equipment when advancing to all-grain brewing. Mash tuns come in all shapes, sizes and materials, and the ideal vessel for you will depend on your current procedures and future goals as a homebrewer. Mash tuns can be purchased from a homebrew shop, or easily made at home with limited skill and tools.
In this tutorial, we’ll cover how to build a mash tun for batch sparge brewing (~5 gallon batches), an approachable means of all-grain brewing. For additional instructions, follow along with AHA Director Gary Glass in part three of the Introduction to All-Grain Video Series, as he walks viewers through the steps to building this mash tun.
How it Works
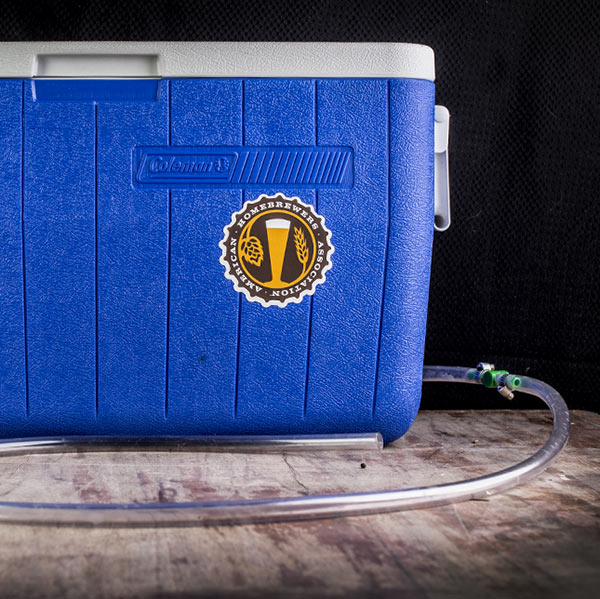
Simply put, a mash tun is a vessel for conducting the mashing process, while allowing for easy lautering—the process of removing the liquid wort from grain solids.
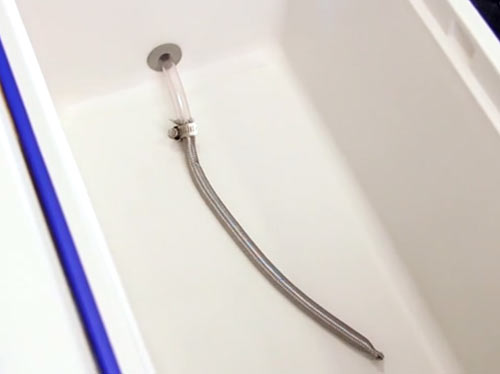
This specific build uses a stainless steel supply line as the filter to allow the liquid to move to the boil kettle, while leaving the grains and as much sediment as possible behind in the mash tun. The supply line is prepared so that there is basically a cylindrical screen of stainless steel that is fine enough to prevent most solids from being transferred, without too much worry of clogging.
Materials
 48 quart picnic cooler
- Rubber mini-keg bung
- (2) 1/4″ hose clamps
- 1/2″ hose clamp
- 3/8″ inline nylon valve
- 7/16″ vinyl tubing*
- 16″ stainless steel supply line**
- Food-grade sealer
*Enough length to reach your boil kettle.
**Shorter or longer lengths should work fine.
Tools
- Scissors, to cut tubing
- Screw driver, for tightening hose clamps
- Needle-nosed pliers, for preparing the stainless steel braid
- Paper towel or rag, to clean up sealer
- Saw, or other means of cutting through stainless steel supply line
Construction
Putting together a mash tun out of a rectangular picnic cooler is actually quite easy. Review the following steps, gather the materials and tools, and you’ll have yourself a homemade mash tun in no time.
- Remove the spigot from the picnic cooler. Typically it can be unscrewed by hand, but you may need to use pliers or some other tool if it is screwed on tight.
- Remove the plastic plug from the rubber mini-keg bung. You will not need this.
- From the inside of the cooler, place the rubber mini-keg bung in the whole where the spigot was.
- Optional: If the mini-keg bung is not fitting snug, food-grade sealer can be used to create a water-tight seal.
- Run 6″ of the vinyl tubing through the mini-keg bung so that there are a few inches hanging out of each side of the cooler.
- Prepare the stainless steel braid:
- Cut off both ends of the stainless steel supply line with snips or a saw.
- Remove the plastic tubing from the inside of the stainless steel braid.
- Using needle-nosed pliers, clamp one end of the supply line shut.
- Attach the prepared stainless steel braid to the end of vinyl tubing on the inside of the cooler using the 1/2″ hose clamp.
- Attach the nylon valve to the end of the tubing on the outside of the cooler using a 1/4″ hose clamp.
- On the other end of the nylon valve, attach a piece of tubing long enough to reach your boil kettle (typically ~2-4 feet) using a 1/4″ hose clamp.
Additional All-Grain Resources
We offer all the resources you need to become an accomplished all-grain brewer!
-
- All-grain batch sparge step-by-step tutorial
- Introduction to All-Grain video series
- All-grain batch sparge downloadable resources
Other resources:
-
- All-grain brew in a bag step-by-step tutorial
- Brew in a bag downloadable resources
- Partial mash step-by-step tutorial
- Partial mash downloadable resources
Share Post