This week’s featured system comes from Milt Barningham. After a few batches of homebrew with distinct off-flavors, Milt Barningham decided to build a new custom fermentation chamber. Here is Milt’s explanation of the inspiration and fabrication!
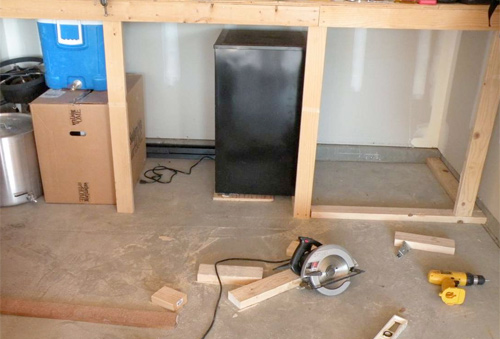
A buddy and I started brewing just a couple of months ago and after two extract batches we jumped right in to all grain. After our first couple of all grain batches we recognized the need for better fermentation temperature control, so I decided to build a fermentation chamber. I didn’t really have room for a full size fridge or freezer in my garage so I decided to utilize the area below my work bench and build the chamber under it.
My garage can reach temperatures close to 100°F in the summer, so I needed a way to cool the chamber. I picked up an almost new 4-foot mini fridge on craigslist for $50 and started to plan the chamber. After I had my general plans I made a trip to Home Depot for materials and got started.
Materials
- 4-foot mini fridge
- Three 2x4s
- 2 sheets of plywood
- 2 sheets of 2” Owens Corning foamular panel insulation
- 2 sheets of white vinyl covered paneling
- some roof metal
- 1 roll of aluminum tape
- 8 tubes of silicon caulk.
Steps
I got started by removing the door from the refrigerator and then building a box under the workbench with the 2x4s and mounting the mini fridge so that it opened towards the chamber to cool it. I then cut the foam paneling to line the inside of the framed chamber. To make the chamber look nice and easily cleanable, I lined the chamber with some vinyl covered paneling. I used caulk and aluminum tape every step of the way to seal all the seams and make the chamber as air tight as possible. It seemed to me that the door was going to be the weak link in the chamber, so I decided to use the original door from the fridge. It already had a magnetic seal built into it, so I used roofing metal to surround the door opening and to give the door something to seal to. I used the original door brackets and modified them to mount the door and make it swing free to open and close just like a normal fridge.
To better circulate air in the chamber I installed three 12V case fans powered by a 12V 500mA supply. To heat the chamber if necessary in the winter months I bought a personal sized ceramic heater and installed it on the bottom shelf of the fridge. Temperature is controlled by a Love 2 stage controller with a single probe and can switch between cooling and heating to keep the chamber at a constant temp all year round.
We’ve now used the fermentation chamber to ferment our last three beers and they have all turned out great. Before the chamber we were getting off flavors and hot alcohol taste due to high fermentation temps, but now our beers are very clean tasting. I would recommend building a fermentation chamber to anyone that is having a hard time controlling temps or is getting off flavors in their beer. Building a quality fermentation chamber that will last isn’t cheap, but I think it’s worth the investment if the quality of your homebrew is important to you. You don’t have to be a carpenter either, I built the whole thing using a tape measure, cordless drill, and a skill saw.
If you’ve got a pimped out system of your own share it in on the AHA Forum under the Pimp My System category. Don’t be bashful; show off your creativity! Who knows, you could be the next star of Pimp my System…
The AHA Forum is communications central for the homebrewing community. Draw upon the collective knowledge of homebrewers around the world to get your questions answered. Help out your fellow homebrewers with their questions.


Share Post