
Greg Niznik of Marietta, GA has been homebrewing since the mid 90s and is here to share a DIY guide for a hand-pump beer line cleaner! No more wasting CO2. Total project cost: $19.25
Parts and Cost Breakdown
- Flo-Master 56HD Hand Pump Sprayer: $6.92
- Firestone Ball Lock Liquid Post: $9.99
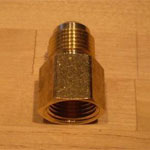
- Watts A-176 3/8 Flare / 3/8 FIP: $2.34
- Teflon Tape: $0.00 (I had this in my shop)
TOTAL: $19.25
Why a Hand-pump?
I wanted to make a small beer line cleaner for my kegerator. Up to this point, I had been cleaning my beer lines by using an extra cornelius keg that I filled with cleaner, pressurized, ran, emptied, rinsed, pressurized, ran… you get the picture.
I wanted something smaller and lighter that I could pressurize without hooking up to CO2. Something easy that I could use between keg changes. Unlike some of the commercial cleaners that hook up to the faucet end of the beer line and flush the lines “in reverse”, I wanted my cleaner to connect to my beer out disconnect so that I could clean that without taking it apart.
 This all started when I found this sprayer at Home Depot. I liked the
I had heard of mention of people using pump sprayers but hadn’t seen a DIY thread, so I decided to try to make one and share my experience
Before You Start
size of it and thought it would be a lot easier to handle than the larger garden sprayers that they sell. It was a Flo-Master Model 56HD.
I picked up a Firestone ball lock liquid post assembly from Brewmaster’s Warehouse (my local homebrew supply shop).
When building this project, it is important to use a Firestone liquid post. Other posts have different threads and will not work. Here is the Brewmaster’s Warehouse part number for the Firestone Post:
The threaded end of the liquid post was 3/8 flare. The threaded end of the pump was 3/8 MIP. I picked up an adapter from Home Depot.
Assembly
Put some thread tape around the flare end of the 3/8 coupling. Thread tape is necessary since there is no flare pipe to keep this from leaking, so you are depending only on the threads to make it tight.
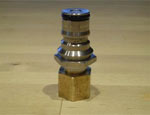
Next, screw the liquid post to the coupler.
Remove the green plastic nozzle from the pump.
And screw the post/coupler to the pump.
Voila, it’s done!
The sprayer’s trigger is disabled when the green nozzle is removed and replaced by the coupler. I did this to simplify the operation of the cleaner. Once the pump is pressurized, the post prevents cleaner from spraying out. Once the beer line is connected, opening and closing the tap will control the flow of cleaner. This way your hands are left free to re-pressurize the pump if needed during the clean.
If you prefer to use the sprayer trigger, there is a small white washer inside the green nozzle that can be placed between the end of the sprayer and the coupler enabling the trigger.
Using the Pump
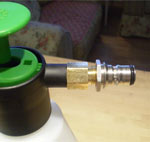
To clean the beer line, fill the pump with your favorite cleaner. Pressurize the pump by pumping the pump. Connect your beer line to the liquid post.
Open your faucet and cleaner will run through the entire system.
This system works well and is a fraction of the cost of a spare cornelius keg or commercial cleaning system. It light weight and easily stored. It’s great for running cleaner through a sticky faucet.


Share Post