
Disclaimer: When a cartoon character gets electrocuted, its furry little body goes stiff for a few seconds and we get to watch its skeleton flash beneath its skin like an out-of-control discotheque strobe. A puff of smoke later, our protagonist enjoys a full recovery and gets back its normal business of dropping anvils on heads. We all intuitively recognize that immortality is a fact of animated life.
Reality, however, is not so kind, and mixing water, wort, or beer with electricity can be deadly. Unless you have the experience and know-how to do electrical work, do yourself a favor and consult a professional electrician before attempting anything related to wall juice. And always, always, always use ground fault circuit interrupt (GFCI) outlets or breakers whenever electricity and water have even a remote chance of meeting one another.
Electric brewing offers a number of attractive advantages over breweries built around propane or natural gas.
- Convenience: Electricity is delivered right to your house, obviating the need to make last-minute propane runs.
- Comfort and Safety: There’s no combustion to create harmful carbon monoxide, so you can safely brew indoors. No more Minnesota snowstorms to disrupt your brew calendar!
- Efficiency: Electrical immersion elements deliver heat directly to strike water and wort with virtually no loss, while a typical gas burner can lose up to 60 percent of its heat output to its surroundings. A 5,500 watt (18,767 BTU/hour) heating element outperforms an 80,000 BTU/hour (23,446 watt) propane burner.
- Precision: Electrical heating elements are easily controlled and lend themselves to automation and repeatability.
- Happy Ear Holes:If you’ve ever suffered minor hearing loss from the deafening jet engine roar of a gas burner, you’ll appreciate the silence of an electric brew rig.
- Cost: In most locations, brewing with natural gas is two or three times more expensive than brewing with electricity, and using propane can set you back five to ten times as much.
But going electric isn’t as simple as plugging into an outlet and getting your mash on. You need to have enough oomph to heat your brewery and crank out a brew day in a reasonable amount of time. And you need to do so without blacking out the neighborhood à la Clark Griswold. Fortunately, with a little simple math, you can figure out how much power you need and whether or not you’ll have to re-wire your house to get it.
Electricity Basics
Voltage (measured in volts) is the force, or amount of potential electrical “pressure” that a circuit offers. Everything you plug into an outlet—be it a coffee maker, a hair dryer, or an electric boil kettle—offers a certain resistance (measured in ohms) to that push. The resulting current (measured in amps) is a measure of the flow of electricity required for the given voltage to overcome the imposed resistance.
You can think of it like rocks in a stream (or islands in the stream if you prefer). A stream of a given depth and speed exerts a certain pressure on everything that gets in its way. That’s like voltage. If you plunk down a big boulder right in the middle of the stream bed, the flow has to accelerate around said boulder in order to move the same volume of water through the narrow restrictions on either side. The boulder is like resistance, and the flow rate of the water is like current.
Voltage is set by your electrical outlet. Most electrical circuits in North America deliver 120 volts, while those in Europe and much of the rest of the world usually offer 220 to 240. Having more volts means you have more electrical oomph available to power your devices. Resistance comes from what you plug into that circuit. And current is the flow of electricity that results from a given voltage trying to overcome the resistance your device provides.
Current is what gets you into trouble. Why? Because current and heat are directly related. In a very general sense, the higher the current, the more a device (resistance) heats up. Standard household circuits in North America are typically sized to max out at 15 amps of current (20 amps in some cases). Exceeding a circuit’s capacity in a modern house means throwing a circuit breaker. Exceeding it in older construction means burning out a fuse. And exceeding it in really old construction means burning your house down.
Thus, the fundamental question of electric brewing is this: How can I safely deliver enough heat to my brewery to complete my brew day in a reasonable amount of time?
Getting Hot Water Without Getting Yourself in It
Water is among the most stubborn substances when it comes to heat. It takes a tremendous amount of energy to raise the temperature of water, for reasons we won’t go into here (Google “water specific heat hydrogen bonds” if you’re interested). The practical upshot of this little fact of physical chemistry is that you need to deliver a huge dose of energy in order to boil water in a reasonable amount of time.
Heat is the amount of energy needed to raise something’s temperature. A typical 5-gallon (19 L) batch of beer might require in the neighborhood of 7 gallons (26.5 L) of water for mashing, sparging, and boiling. Let’s say that water comes out of your faucet at 60° F (16° C), and for the sake of simplicity, let’s say you want to bring the entire volume to a boil. In order to heat that amount of tap water to boiling, you need to provide about 8,900 BTUs (British thermal units) of heat, or about 9,400 kilojoules. For perspective, that’s about the same amount of energy contained in 50 standard Oreo cookies.
There’s nothing you can do about this energy requirement. It’s a simple fact of chemistry, and you can’t change it. You can, however, control two things:
- The manner in which you deliver heat: gas burner, induction element, electrical immersion element, campfire, thermonuclear device, etc.
- The speed at which you deliver heat: turn up the burner, deliver more electrical power, throw another log (or Oreo) on the fire, etc.
If you’re thinking of an electric brewery, then you’re probably going to be using an electrical immersion element. These come in a variety of shapes and sizes, but let’s say for the sake of argument that you’re going to go with an element made for brewing, like the 4,500 watt and 5,500 watt elements sold over at TheElectricBrewery.com.
These are designed for a 240 volt power source, which is great if you’re in Europe. North American readers who run these at 120 volts, however, will only get a quarter of the rated power, so instead of 4,500 or 5,500 watts, you’ll get 1,125 or 1,375 watts, respectively. Fortunately, all standard-issue electric dryers and stoves in North America require 240 volts, which means that most houses in the United States, Canada, and Mexico have at least one 240 volt circuit available to power such appliances.
In fact, in most cases, power is actually delivered to our houses at 240 volts. When it reaches the house, the supply is split in two. Regular outlets are delivered 120 volts to power most consumer appliances and electronics, while a separate 240 volt circuit is maintained for stoves, air conditioners, dryers, and the like. Here’s why you might want to consider taking advantage of the increased power of a 240 volt circuit.
| Power output | Approximate time to heat 7 gallons of water from 60° (16° C) to boiling |
| 1,125 watts | 140 minutes |
| 1,375 watts | 115 minutes |
| 4,500 watts | 35 minutes |
| 5,500 watts | 30 minutes |
In other words, it’s possible to brew electrically using standard household outlets, but if you don’t want to wait around forever, you’ll probably want 240 volts. Furthermore, you won’t get much of a boil going with just 1,125 to 1,375 watts—just an anemic simmer. If you already have a 240 volt outlet for a dryer or a stove, you’re in luck. Just brew when you’re not doing laundry or cooking!
If, however, you don’t already have a 240 volt circuit, or if you’d like the option of baking a ham or washing and drying your entire collection of 14 brewery-themed work shirts while you brew, consult an electrician on what it would take to install one. It might be easier and less expensive than you think. And unless you know exactly what you’re doing, it’s probably much, much safer.
Staying Safe and Staying Legal
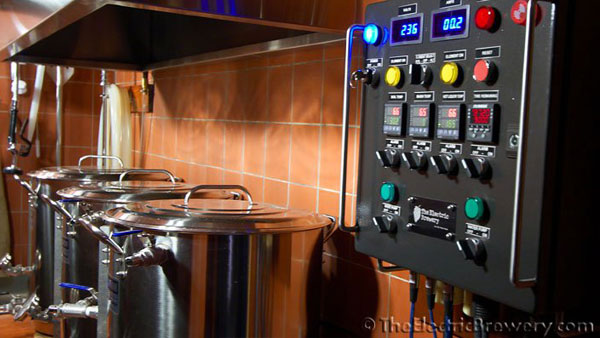
In most cases, brewers looking to produce to up 20 gallons (76 liters) one batch at a time will be well-served by a single 30 amp circuit by alternating between two heating elements: one to heat strike/sparge water and one to heat the boil kettle. This cost-effective approach only draws 23 amps from a 240 volt circuit. An added bonus is that the sparge water slowly cools over time, which helps minimize tannin extraction as runoff gravity drops and runoff pH increases. A well-built control panel like the standard panel offered at TheElectricBrewery.com includes features to easily and safely let you switch between two elements so you don’t overload your circuit.
Anyone with a 30 amp dryer line can easily brew up to 20 gallons (76 liters) at a time with an electric rig, and a 50 amp circuit lets you do considerably more, two to three barrels even, by running two 5,500 watt heating elements at the same time. This is also a handy setup if you’d like to mash a second batch while the first boils. Understand, though, that running two elements simultaneously will draw 46 amps from your 50 amp circuit. In some jurisdictions, the local building code may not permit consumer devices to use more than 80 percent of a circuit’s maximum current rating (40 amps on a 50 amp circuit), but the National Electrical Code (NEC) does allow you to exceed the 80 percent restriction if (1) the device is not a hot water tank, and (2) it isn’t run continuously for more than three hours. So while electric brewers who want to use two heating elements at once are probably fine with a 50 amp circuit, it’s a good idea to check with your local regulatory authority just to be sure.
The point of all this is that electric brewing is about more than just buying a device and plugging it in. You need to understand how you want to brew and how many simultaneously running electrical devices you need in order to do so. Then you can work backward to determine what kind of brewing equipment and wiring upgrades, if needed, will get you there. Evaluate your home before you start planning your brewery so that come brew day, you get the juice you need while staying safe and complying with local building codes.
For more information on electric brewing, check out the excellent resources available at TheElectricBrewery.com.
* * *
Dave Carpenter is editor-in-chief of Zymurgy magazine and lives in Fort Collins, Colorado. Kal Wallner is founder of TheElectricBrewery.com and an electrical engineer from Ottawa, Canada.
Share Post