Introducing Jamie’s wort chiller! He has built a great wort chiller, piecing together different supplies and coming up with something truly unique. Jamie chose to create his own wort chiller both to cool down his wort (to proper yeast-pitching temperatures because the faster your wort gets to your yeast-pitching temperature, the lesser chance you have of bacteria spoiling your beer) and make something on his own. Here is what he had to say about his wort chiller:
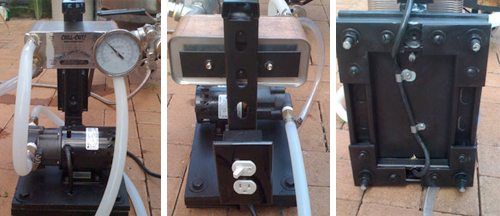
This was actually pretty simple to build, but since I don’t know how to weld I decided to build the base out of unistrut (a metal framing material). I built the base, and then drilled 4 holes into each corner of the plywood (cut to 8 ½” x 11”) and bolted the plywood to the unistrut base.
I wanted the wort chiller setup to be sturdy and have a carrying handle. I then made the carrying handle/chiller mount using two pieces of unistrut, and bolted them together. I took a piece of 1 1/2 “ flat steel, drilled a hole in the center to bolt to the unistrut, and I drilled two holes which lined up with the mounts on the back of my chiller. Now it was easy to transport.
Once I had the frame built, I primed it and painted it with Plasti-Dip paint (a moisture resistant, rubber coating paint). It seems to look pretty so far.
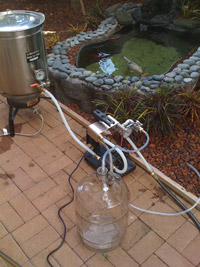 I mounted the march pump to the base with wood screws and it sits slightly in front of chiller. I did this in case any of the tubing leaks. I should probably have made the base a little bigger, and mounted it farther forward, but it works fine as it is. I ran the cord under the base to try to keep the whole unit it bit sleeker looking. I also mounted a switch on the backside, so that I can quickly turn the pump on/off rather than running to plug or unplug it. I put an outlet on the back as well in case I ever need one. I brew outside, so the receptacle I plug into is a GFCI. *If you make this and brew inside, make sure the outlet you plug into is GFCI protected.
The tubing is pretty straight-forward. I just made sure I used a high-temperature food grade tubing from my brew kettle to my pump, and from the pump to the chiller. Soon, I am going to be adding stainless steel quick disconnects to the tubes, so cleaning and back-flushing will be much easier.
Below, is a list of parts Jamie used to build his own wort chiller:
| Quantity | Part | Cost |
| 40 | plate wort chiller | $125.99 |
| 1 | 809-HS march pump | $149.99 |
| 1 | Ther-monitor display | $69.99 |
| 1 piece | unistrut | $16 |
| 2 | nylon cone nuts (5-pack) | $3.15 ea. |
| 4 | 1/2” 3 hole flat corner bracket | $2.75 ea. |
| 2 | 1/2” 2 hole 90° angle bracket | $1.97 ea. |
| 1 | 11/2” flat steel | $11 |
| 1 | 81/2” x 11″ plywood | $6 |
| 4 | bolts, washers, nuts (for plywood) | on hand |
| 1 | aerosol can Plasti-Dip | $5.98 |
| 1 | teflon tape | $1.26 |
| 3 | WATTS A-390 hose barb | $3.42 ea. |
| 1 | 8′ grounded cord | $10 |
| 1 | handy box | $1.14 |
| 1 | switch/receptacle | $10 |
| 1 | black cover plate | $0.59 |
| 1 | garden hose adaptor | $4 |
| 5 | hose clamps | $3 |
| 5 | 1 ft. high temp tubing | $2.99/ft. |
This is a truly unique wort chiller that Jamie has created. It is great that he gets to make his own beer with the addition of more homemade products. This makes Jamie’s beer that much more unique and individual. Keep up the awesome work and we hope it keeps chilling!
If you’ve got a pimped out system of your own share it in on the AHA Forum under the Pimp My System category. Don’t be bashful; show off your creativity! Who knows, you could be the next star of Pimp my System…
The AHA Forum is communications central for the homebrewing community. Draw upon the collective knowledge of homebrewers around the world to get your questions answered. Help out your fellow homebrewers with their questions.
Share Post