
Originally published in the July/August 2011 issue of Zymurgy magazine.
Making good mead is easy, if you build on Ken Schramm’s The Compleat Meadmaker methods but update them with his latest recommendations. Using techniques from the commercial winemaking world allows mead to be made faster and require less aging than previously thought possible. Other innovative ideas from award-winning mead makers are also incorporated into the process.
Honey Choices
The dominant aspect of most meads, and the primary fermentable sugar, is honey, which is where the character of a straight honey mead will come from. For metheglins, melomels, and braggots, it is desirable for the honey to complement the characteristics of the other ingredients, so honey choice requires additional thought.
Good beginner honeys include orange blossom, tupelo, raspberry blossom, mesquite, cotton, clover, and some wildflower varieties. The names refer to the floral source the bees visited to collect the nectar. Wildflower honey is a “generic” honey from assorted varieties of flowers—not from a single floral source. Wildflower honey varies significantly based on locale and season of harvest. Honey can have year-to-year variation even from the same beekeeper and floral source. Honey is heavy and thus expensive to ship, so it’s desirable to use locally sourced honey if possible. Farmers markets are often a good source. Remember, most honeys are not going to taste like the fruit from the floral source—orange blossom honey does not taste like oranges, for example. Crystallized honey is fine for mead making.
Fruit Meads: Melomel, Pyment, and Cyser
Putting fruit in the primary is my preferred way of making fruit meads. Some mead makers believe that some of the fruit aroma is lost during primary fermentation. However, fruit will typically have additional nutrients not found in honey, aiding in fermentation. Different ester profiles are also attained from exposing the fruit to primary fermentation. Jon Hamilton at White Winter Winery puts the fruit in primary for all of his meads.
A good starting point with most fruits is about 3 pounds of fruit per gallon of mead, though I have been known to use 5 or even 6 pounds of fruit. Fruit blends can produce some great-tasting meads. Use your imagination, or peruse the breakfast juice blends at the grocery store for ideas. Buy fruit when it is fresh and inexpensive; freeze it if you aren’t ready to use it right away. Wash/rinse the fruit in warm tap water, and cut up large fruit like peaches and mangos. Spray it lightly with a 50 ppm solution of sulfite before freezing. The sulfite inhibits undesirable bugs and helps prevent oxidation. Freezing will generally help break down the structure of the fruit and make it easier to extract the essential characteristics. Freezing the fruit does not sanitize it, but you can still put it into the primary.
Whole fruit typically floats in the fermenter, so it should be pushed back into the must a couple times a day. The process is roughly like wine making where the skins need to be kept wet. If you stir your must vigorously, beware of pulverizing the fruit to the point of extracting too many tannins and creating puree that you will have to rack off of later. For messy fruit like black currants that have lots of little seeds and pulp after fermentation, use a large fine mesh bag to hold all the fruit. Boil the bag to sanitize it, put the fruit in, tie it shut, and drop it into the primary. The percentage of fermentable sugars in fruit varies significantly; some fruits like strawberries and melons are mostly water.
Most homebrew shops sell a number of fruit purees that are readily available even when fresh fruit is not. They provide good fruit character but can leave significant sediment that can cause racking losses. I suggest avoiding the small bottles of fruit flavoring. They can supplement fruit characteristics, but when used exclusively are one-dimensional.
Fruit juice and concentrates work well for making melomels and typically have very little sediment. Check the ingredients and beware of the ones that are sweetened with sugars or even white grape juice. Concentrated fruit juice has a typical concentration of 8 to 1, meaning 1 quart of the concentrate is equivalent of 2 gallons of fresh pressed fruit juice. The first time you use a fruit concentrate, experiment to determine how much to use since most sources don’t list the equivalent weight for fresh fruit.
For pyments, I find using unconcentrated fresh grape juice leaves a more delicate character than using concentrates, but fresh wine grape juice is available only for a very short season. Alternatives include using a good wine kit as the source for the grape juice. With either fresh juice or a reconstituted wine kit, the grape juice should be around 1.095 original gravity (OG). Just adding honey to the juice is going to quickly push the OG of the must to sack strength. The addition of water will allow you to lower the OG at the expense of the wine character. A good starting point is about 3 gallons of grape juice in 5 gallons of must, though I frequently make pyments by just adding honey to the grape juice with no additional water. Use a wine yeast appropriate for the type of grapes you use. Subtle additions of spices can work well, taking care not to overwhelm the honey or grapes.
The use of pectic enzyme can help clarify your mead by eliminating pectic haze. Follow the package directions. While post fermentation finings can eventually clarify your mead, the use of pectic enzymes at the start makes clarifying fruit meads easier.
Metheglin
For most metheglins, I don’t add spices until the mead is ready to be packaged, with the exception of ginger. Spices vary greatly from batch to batch and with age, so that awesome mead with 3 ounces of dried poblano/ancho peppers may be too hot the next time you try it. For my ginger mead, multiple pounds of sliced ginger go in the primary in a mesh bag, and are treated more like a fruit right at the start. For most other spices, I steep them in a covered glass jar with enough cheap vodka to cover the spices. A week or two is sufficient to extract the essence of the spices into the vodka. Accurately measure some of the mead into a small glass and use a medicine dropper to add few drops of the vodka to the mead (keep track of how much vodka you use). Try a few different tests by increasing or decreasing the amount to taste. Once you have the desired spice level, scale the vodka addition for the size of your batch of mead. Sweetness (more honey) can balance an over-spiced mead. Conversely, hot spices like cinnamon or peppers can balance mead that is otherwise too sweet.
How Much Honey?
The specific gravity of honey will vary slightly based on the floral source and moisture content. Table 1 shows the approximate specific gravity (SG) and equivalent weight per gallon of honey for a range of moisture levels. That variation helps explain why a recipe may yield slightly different OGs even if you measure everything accurately.
| Water Content (%) | Specific Gravity | Weight per Gallon (lb) | Points per pound per gallon |
| 13 | 1.4457 | 12.0716 | 40.29 |
| 15 | 1.4350 | 11.9823 | 39.35 |
| 17 | 1.4237 | 11.8879 | 38.44 |
| 19 | 1.4101 | 11.7743 | 37.51 |
| 21 | 1.3950 | 11.6483 | 36.58 |
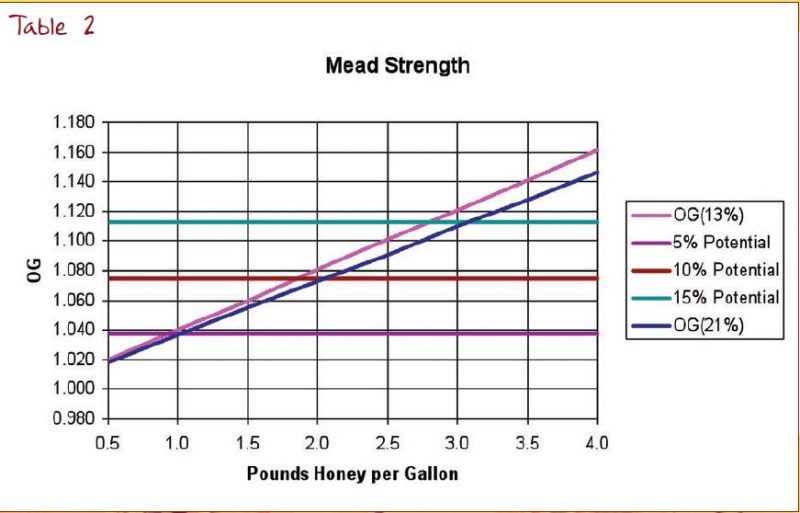
Table 2 shows how much honey you need to make mead. It graphs the weight of honey needed to reach a target OG in 1 gallon of must. Two lines (one for 13 percent and one for 21 percent moisture content) bracket the range. The horizontal lines estimate the alcohol potential based on OG, assuming the yeast can ferment the honey completely. Reference the alcohol tolerance of your yeast strain to determine what OG you should target to achieve a desired FG. For example, the Lalvin 71B-1122 strain is said to have an alcohol tolerance of 14 percent, so if your OG is below the 14-percent (approximately 1.105) alcohol potential, you are going to get a FG around or even below 1.000, a dry mead.
Water
Brewing water, with no chlorine or off-flavors and a hardness of 250-500 ppm as carbonate, is optimal for most meads. The carbonates help buffer the fermentation and keep the pH in a reasonable range for yeast performance. If your municipal water supply has a carbonate level outside the range, you can still make good mead, though fermentation may be a little slower. Alternatively, you can add carbonates with chalk or neutralize them with acid as appropriate.
Staggered Nutrient Additions
The idea of staggered nutrient additions comes from the commercial wine making world. They give the yeast some just-in-time nutrients to keep it in the growth phase, reduce off-flavors, and produce fewer fusel alcohols.
Mead by the Numbers
Original gravity ranges:
- Hydromel: 1.035 – 1.080
- Standard: 1.080 – 1.120
- Sack: 1.120 – 1.170
Final gravity ranges:
- Dry: 0.999 – 1.010
- Semi-sweet: 1.010 – 1.025
- Sweet: 1.025 – 1.050
For a typical 5-gallon batch of mead, the suggested staggered nutrients are two teaspoons (8 grams) of diammonium phosphate (DAP) and one teaspoon (4 grams) of Fermaid K. Add one quarter of the mixture initially (with the yeast) and the remainder a quarter at a time, either daily or every other day. A few great mead makers just add all the nutrients right along with the yeast. Regardless of the nutrient addition schedule, the use of nutrients is important since honey has very little of its own.
Dry Yeast Hydration
I use dried yeast almost exclusively, with Lalvin 71B-1122 used most frequently and D-47 as a second choice. If using dried yeast, start with a yeast rehydration nutrient to help it get off to a good start. GoFerm is a relatively widely available version of a yeast rehydration agent. Follow the package directions, mixing the GoFerm into the warm rehydration water (typically 104° F/40° C) before adding the yeast.
Process
During the first days of fermentation, it is helpful to ferment in a large open top vessel like a plastic bucket with a lot of head space. For a 5-gallon batch, you will need a 7.5- to 10-gallon fermenter. Pour the approximate weight of honey into the fermenter, then slowly add some of the water (if using fruit juice or concentrate, add it before the water) and stir. Using a sanitized hydrometer, check the specific gravity. Slowly add water until you hit the target OG. Use water near the temperature recommended for fermentation with your yeast strain. I try to keep to the lower half of the recommended temperature range. Fermenting too warm for the yeast will produce more esters and hot alcohols than desired.
Mix the GoFerm into the warm rehydration water, then add the yeast and start a timer for the recommended hydration duration.
While waiting for the yeast to rehydrate, measure out the nutrient addition for the batch and place it in a Ziploc bag near the fermenter. Add the initial quarter of the nutrients to the must. If you are using pectic enzymes, add them to the must now as well. Pour the yeast and GoFerm mixture into the fermenter. Stir the must to get some initial oxygen into it.
At least daily, aggressively stir the must to drive out the CO2 and allow oxygen to be infused. The yeast are very active and will rapidly consume all the oxygen you are introducing. If you’re using a spoon, stir aggressively until bubbles are no longer released. These days I use a stainless steel wine degassing wand and an electric drill. Start slowly, as the first bit of stirring can create a lot of foam quickly. Add the staggered nutrient additions as per your schedule.
Stirring with a wand in the drill when there is a large bag of fruit in the fermenter is a challenge. I suspend the bag of fruit above the bucket with a sanitized spoon through the drawstring while holding the drill in my other hand.
Typically, within a couple of weeks the fermentation is nearly over and you can rack the mead to a carboy to clarify. Even if fermentation is going slowly, don’t leave the mead in plastic for more than a month, as the fermenter will allow too much oxygen in when the yeast are no longer able to consume it.
Finishing the Mead
Time will clear most meads, but Super-Kleer K.C., a two-part liquid clarifier, is very effective. Follow the package instructions.
If you plan to sweeten your mead after fermentation, potassium sorbate can help stabilize it by retarding further yeast reproduction but allowing existing yeast cells to ferment. If you have not reached the alcohol limit for your yeast, adding more fermentables is likely to restart the fermentation. Even a clear mead still has some active yeast cells. Sweeten a mead that is too dry by adding more honey or blending with a sweeter mead. If your mead is still in primary and your SG check shows it is lower than you wanted, add honey to push the final gravity up, though you will also likely be raising the alcohol level.
Balance an overly sweet mead by adding acid—ascorbic, citric, tartaric, acid blend, malic, or even lactic; sometimes even some tannin. Alternatively, you can blend a sweeter mead with a drier mead. No matter which approach, go slowly so you do not overshoot. Dissolve the acid in water to create a strong solution. Use an accurately measured small amount of the mead in a glass (or in several glasses) and add a few drops of the acid solution to find the appropriate amount. Add a drop or two at a time. Using several glasses allows you to compare the different amounts side by side. Once you have the desired amount, scale the amount up for the whole batch.
For sparking mead, you can keg and force carbonate or bottle condition just like you do for beer. When bottle conditioning a sparkling mead that has already hit the alcohol limit for the yeast strain, you are going to have a hard time creating any CO2. But adding another yeast strain with a higher alcohol tolerance to get CO2 can be dangerous—that new yeast might restart fermentation in the mead you thought was finished and could create glass grenades. These days I only make sparkling meads by forced carbonation.
Aging can either improve or degrade mead. It may reduce astringency and will slowly reduce some higher alcohols. But fruity esters may degrade, and acids may drop out as crystals. Overall, the best approach is to avoid higher alcohols to begin with and to treat the yeast well so as to get the alcohol and ester profile you want right out of the fermenter.
Steve’s Pyment Recipe
Ingredients for 5 gallons (19 L)
For pyment, I’ve used a couple of variants. The first uses grape juice and water plus honey. The second uses just grape juice and honey. The latter will provide more grape character since you are not diluting the juice, but you are also going to end up with a sack-strength mead with a fair amount of alcohol. With the first technique, you can produce a lower OG and even get a hydromel-type pyment. Given that most wine grape juice is in the range of 1.095 OG, unless you add a lot of water along with honey, the final must OG is going to be fairly high. The recipe here doesn’t add any water to the must.
- 12 lb (5.4 kg) Orange Blossom Honey
- 4.25 gal (16 L) Gewurztraminer juice
- 1 tsp. Fermaid K
- 2 tsp Diammonium Phosphate
- 1 packet Lalvin 71B-1122 yeast or Lallemand 58W3 yeast
- GoFer, for rehydration
- Original Gravity: 1.146
- This will result in a medium sweet pyment. Gerwurztraminer grapes tend to taste slightly sweet enven when fermented dry. If you are using juice from a wine kit, consider using the whole kit and increasing the honey slightly to reach the target OG with the slightly large batch size the kit will produce.
Directions
Pour the honey into a large plastic fermenter. Start adding grape juice to the fermenter. After just a couple gallons, start stirring the mixture. Once you have a couple gallons of juice and honey mixed together, place a sanitized hydrometer in the must. Slowly add the juice and mix after each addition until you hit the target OG. Add 0.5 teaspoons of Fermaid K and 0.25 teaspoons of diammonium phosphate to the fermenter.
Rehydrate the yeast in GoFerm, following the package directions. Once rehydration has finished, mix the rehydrated yeast and liquid into the fermenter.
Once or twice a day, stir the must. The stirring process will release a lot of CO2 from the must. I stir until almost no more bubbles are released by additional stirring. If doing the stirring with a spoon, it will take a while to drive our all the CO2. Using a wand in the drill is faster, but be careful not to release so much CO2 so fast that the fermenter foams over the top.
Once a day, after a round of stirring, add the dose of nutrients, 0.5 teaspoons of Fermaid K and 0.25 teaspoons of diammonium phosphate.
After three to four weeks, rack the mead into glass and wait for it to drop clear. You can use Super-Kleer K.C. to help the clarification if the mead has finished fermenting. Once clear, keg and carbonate to around 3 volumes of CO2.
While his first fermentation experiments were with cider, these days Steve Piatz mainly makes mead, or brews beer on his all-grain setup. He is a BJCP Grand Master IV judge, a BJCP exam director, and a member of the Saint Paul Homebrewers Club and the Minnesota HomeBrewers Association.
Share Post