
Inspiration
I’ve been involved with brewing since 2006, but I came into the homebrewing side of things just three years ago. With my TIG welding and machinery building experience, I had been helping with equipment fabrication and system improvements at a local micro-brewery before getting into homebrewing with my son-in-law, Tim. We started out extract brewing, but upgraded to a gravity fed, PID controlled, all-grain system after only a few extract brews.
The inspiration for this newest system ranged from the desire for larger capacity brews to the dislike of lugging buckets of water to and from the garage where we brew. Add that to my love for building stuff and we have the latest StoneHouse Brewery gas-fired RIMS.
Materials and Construction
I designed the system for up to 20-gallon pots, but also to be able to handle our 8-gallon pots in case we are only brewing a 5-gallon recipe for the best efficiency.
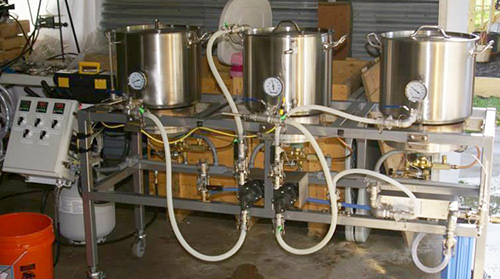
The frame is 1-1/2″ square tubing TIG welded and powder coated with lockable swivel casters. The lower back cross rail doubles as a fuel rail for the burners, giving an extra volume of regulated gas to keep the burners stable as other burners are kicking on and off. The burner pilot safeties are gas log fireplace pilot assemblies, which I purchased on eBay.
The main flame control is via fuel-rated ASCO valves and inline flow controls for flame adjustment. The fuel rail is fed by an adjustable high pressure propane regulator purchased from one of our great homebrewer supply stores. The burners are BG14 banjos for the HLT and boil with a BG10 for the RIMS burner.
Pot supports and burner shields are all TIG welded stainless steel and stainless bolts are used throughout. Both pumps are Marsh 815s and all connectors on the system are 1/2″ stainless camlocks to give us the most flexibility in configuring the system.
An on-board whole house water filter supplies water through a RV potable water hose from the house to the water supply system and 30 plate heat exchanger to chill the wort quickly. A drain connector on the system allows us to rinse and drain water out to thirsty plants and grass.
Pots are all set up with male 1/2″ camlocks directly out of the side so we can remove the valve and temperature reading “T” assemblies quickly for cleaning. This also makes for less stuff hanging off the side of the pots when handling/storing them. In fact all of the system components have male camlock connectors and all of the silicone hoses have female connectors. A nearby hose rack hangs all of the hoses we need for various configurations, including a high pressure reinforced hose for high pressure flushing of system components.
The mash tun uses a “T” slot design laser cut false bottom, our absolute favorite, and a milled multi-path support grid with central pick up. The boil kettle has a side pick-up tube and I fabricated a drop-in whirlpool assembly that does a great job of piling the trub in the center of the pot away from the pick-up which keeps the biggest share of it out of the heat exchanger.
The electrical side consists of 3 PID temperature controllers purchased on eBay, along with five 3-position switches for the burners and pumps with on/off/auto positions in a fiberglass control panel.
The PID controllers fire DIN rail mounted Allen Bradley relays, as are the pump switches. There is an auto position for pump one, which is controlled by a Turck capacitive proximity sensor that senses the level in the mash tun through the sight tube during fly sparging.
I machined a UHMW plastic block that slides along the sight tube with the sensor mounted in it allowing us to select the water level we want over the grain bed. The sensor kicks the pump on/off as required to maintain the level. All we have to do is set the transfer rate to the boil kettle from pump two.
I read the RIMS temp in the outflow of the mash tun with a T and a Type J thermocouple. I use the same set up for reading the chilled wort temp out of the heat exchanger. We pump hot wort through the heat exchanger directly to the Better Bottle primary fermenter through an aerator nozzle. I’ve mounted a small tool box behind the control panel that has all of the essential tools along with spare o-rings and seals that might be needed.
How it Works
We’ve had three brew days with the new system the first two were single recipe days. Today was our first two recipe day where we had a batch recirculating in the mash tun while we finished boiling, whirlpooling and chilling the first batch.
So far the new system is performing better than I had hoped and we are just learning best practices for it. The next addition to the system will be a stainless windshield on the sides and back to keep wind from blowing under the pots during outdoor AHA Big Brew events.
If you are going to be in Grand Rapids, Mich., for next year’s AHA Siciliano’s Big Brew (May 3, 2014), stop by and check out the system in action and taste some StoneHouse Brewery beers.


Share Post